Deliverability
Email authentication: Your ID card for sending
You can’t drive a car without a license. You can’t fly to another country without a passport. And you can’t be a sender without authentication. But what does authentication entail, and which ones do you need to secure your identity? Find out in our post.
PUBLISHED ON
Email authentication lets mailbox providers know that you’re a trusted sender – that you are who you say you are. As a Technical Account Manager at Mailgun, I’m constantly talking to my customers about how to protect against fraud, spoofing, phishing scams, and how to stay out of the spam folder. One of best practices is securing your email marketing program with email authentication.
But there’s another key reason why email marketers should go through the process with SPF, DKIM, DMARC, and BIMI. (Don’t worry, I’ll explain those acronyms in a minute.) Big-name inbox providers like Gmail and Yahoo will require bulk senders – defined as sending more than 5,000 messages per day – to authenticate their email. If you want to send email to subscribers that use these popular services, it’s time to go through the authentication process.
When we asked senders about their authentication practices for our State of email deliverability report, we found that around 40% are either unsure or not implementing both SPF and DKIM, and among those using DMARC, 40% are not sure what their policy is. Let’s fix that. In this post, we’ll guide you through the email authentication process so you can protect your email marketing program and improve your deliverability:
Table of contents
How email authentication works
How Sender Policy Framework (SPF) works
How Domain Keys Identified Mail (DKIM) works
Setting your DMARC policy
Establishing reverse DNS/Pointer (PTR) Records
Choose your reporting structure
What is email authentication?
Email authentication verifies sender identity using multiple methods to separate messages sent by real senders from forged ones. Taking ownership and authority of your email and server shows mailbox providers that you’re legit. And it makes it that much more difficult for spammers to impersonate you in the inbox. It’s like a virtual ID card for your domain, as Jonathan Torres explains in this video.
Establishing brand legitimacy with email authentication isn’t the most glamorous part of sending email. It’s not as fancy as building templates or copywriting the overall email message, but without it, your emails are more likely to land in the spam folder. Better email deliverability starts all the way at the beginning with initial setup and authentication.
Different providers may require different authentication setups. Required details like which authentication protocols you need and what conditions you need to configure can vary but going without authentications can get you marked as a fake sender even if you’re not. (And we recommend checking all the boxes, anyway.)
Plus, having the right email authentication in place lets mailbox providers like Gmail catch phishers and fake emails faster – something we can all get behind.
How email authentication works
Email authentication works by using DNS records to verify different aspects of your sender identity. Some records let the receiving server validate the hosts that are allowed to send messages from a specific domain, and others verify sender identity with public-keys and electronic signatures. The policy you set is up to you and the record types you choose.
The authentication process works like this:
A business develops a policy to manage how email sent from its domain name is authenticated.
The email sender configures its mail servers to implement and enforce the policy.
The recipient’s server authenticates the message it receives against the business's authentication policy.
If authenticated, the recipient’s server accepts the message. If it fails authentication the message is managed based on the policy in place:
Deliver it to the inbox anyway
Allow the message through but send it to the spam folder
Reject the message (blocking it from deliver)
Doing this improves your deliverability by signaling to mailbox providers that you’re sending legitimate emails, because you’ve gone through the proper email authentication protocols. That means your message should sail through to the inbox instead of landing in the spam folder, unless the subscriber has marked you as such.
Senders have several different authentication methods to choose from to make this happen. Our recommendation? Doing them all completely secures your email marketing program, improves your deliverability, and helps you comply with new inbox regulations. The authentication processes build off one another to close any gaps one authentication method might leave open.
Here’s how to do each one:
Email authentication methods
An email authentication method is any technical standard that makes domain-based email authentication possible. The elements that are being verified can vary from method to method, but they were all designed as standards to support Simple Mail Transfer Protocol (SMTP) – the main protocol (other than API) used to send email. SMTP works well, but it doesn’t have built-in security which is why authentication methods exist.
Right now, mailbox providers like Gmail and Yahoo will require you to complete SPF, DKIM, and DMARC. But there’s a fourth email authentication protocol that’s worth checking out, called BIMI. Here’s how to complete the process for each one:
How Sender Policy Framework (SPF) works
Sender Policy Framework (SPF) was the first real attempt at an email authentication protocol, devised in the early 2000, SPF utilizes a Domain Name System (DNS) TXT record to specify which email sources are valid email senders for the given domain and what to do with the messages that don’t originate from those sources. It acts as a digital bouncer; if you aren’t cool enough to be on the list, you’re likely to get kicked to the curb (or land in the spam folder).
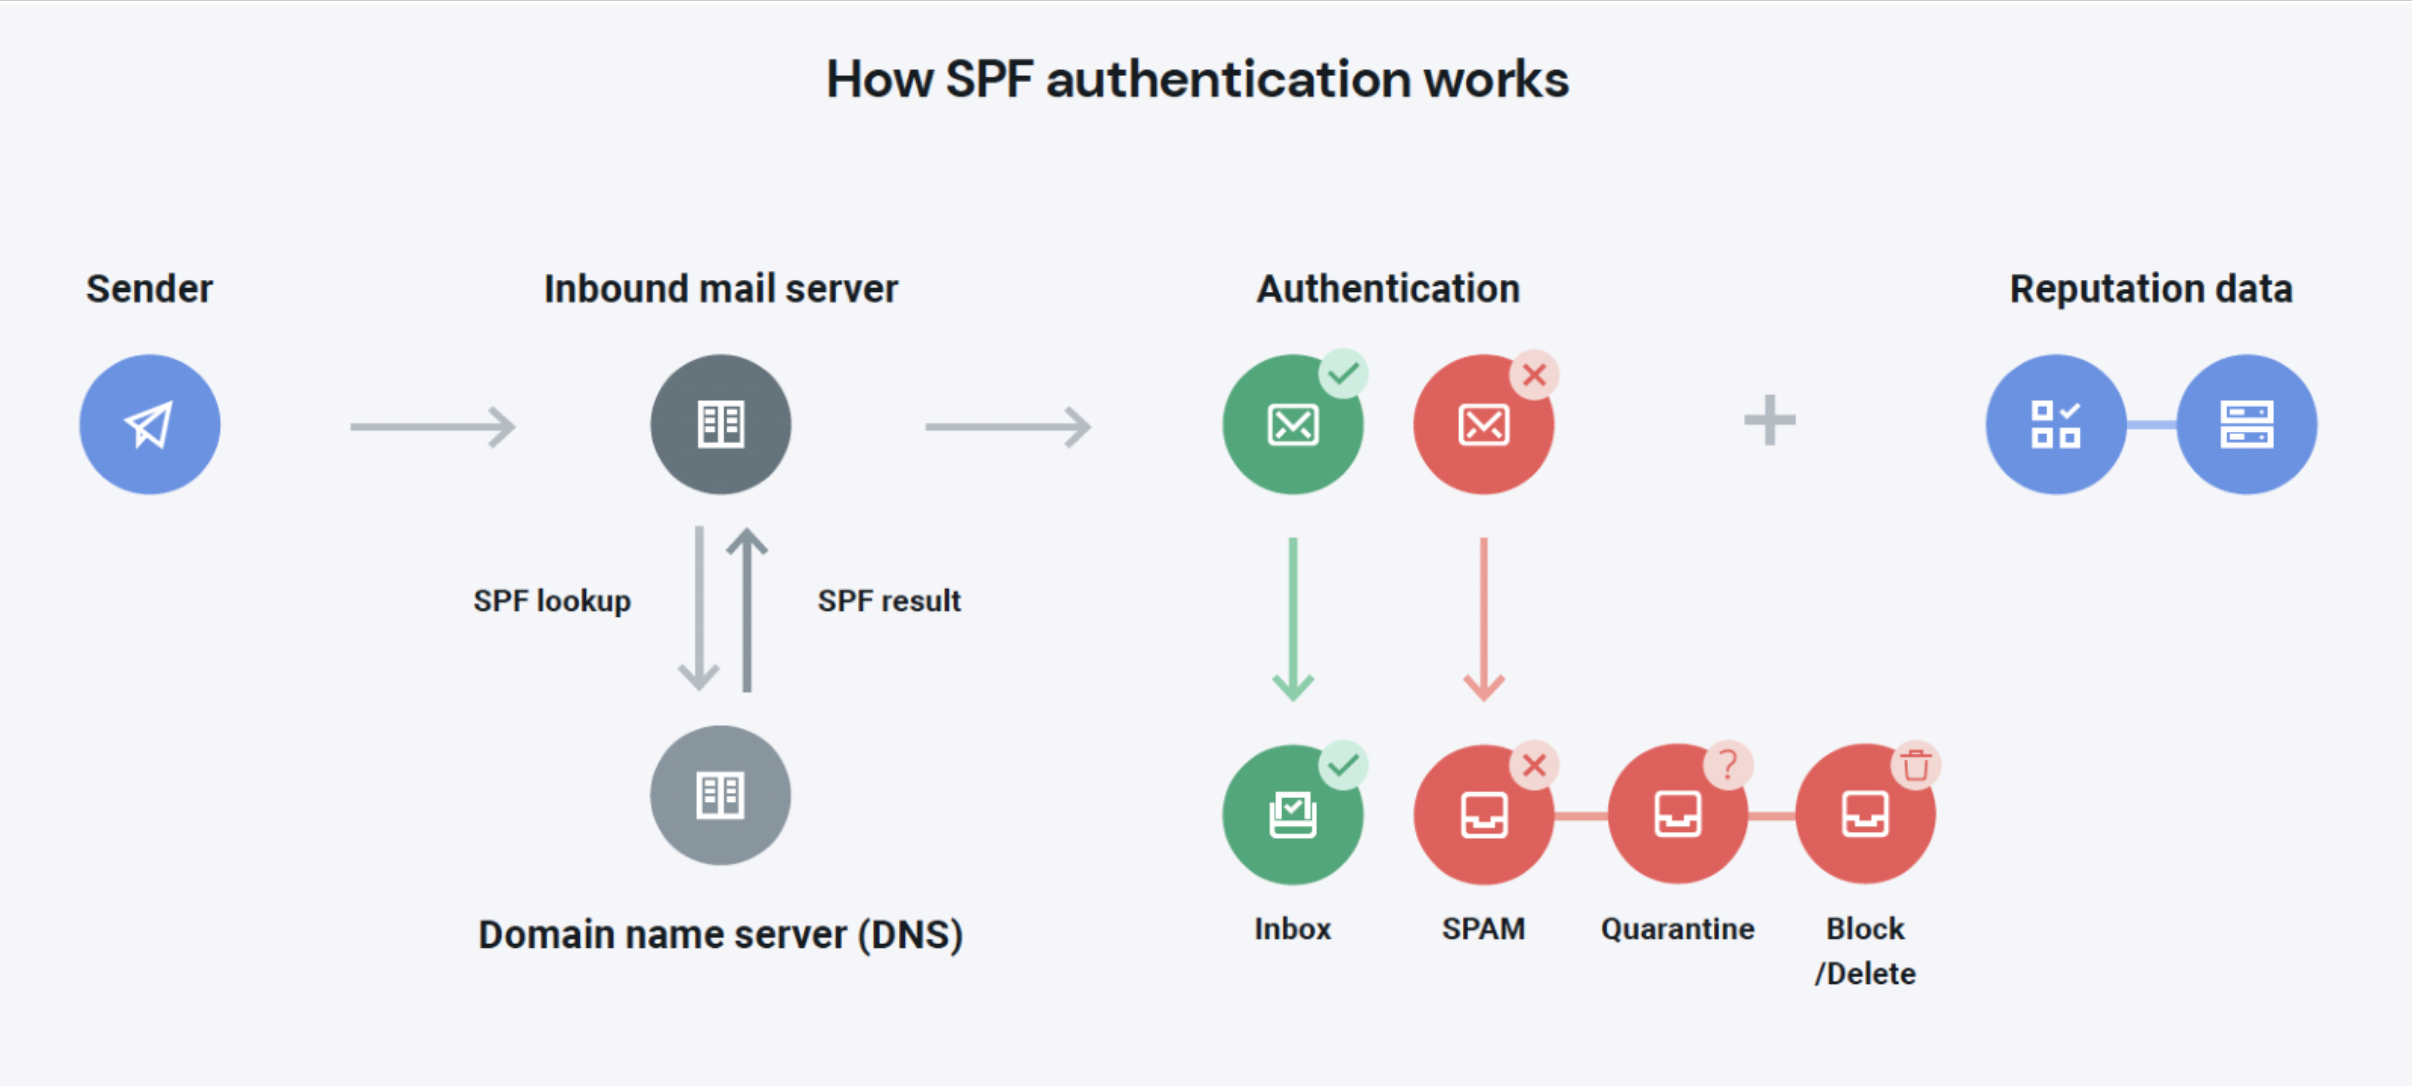
An SPF record consists of a collection of mechanisms and qualifiers that tell mailbox providers who should be sending mail on behalf of a domain. The mechanisms identify the email servers while the qualifiers tell us what to do with them. Most ESPs cover your SPF requirements – we do here at Mailgun.
When you establish your SPF records, keep these in mind:
Only one valid SPF record is allowed per domain. Multiple records can confuse recipient systems.
SPF implementation MUST limit the number of mechanisms and modifiers that do DNS lookups to at most 10 per SPF check. (This does take into account INCLUDE and REDIRECT mechanisms.)
We recommend using
~allas the final entry in the record, but we certainly accept-allas well.We do support SPF recording chaining for whitelisting. See this blog for details.
SPF records consist of a collection of mechanisms and qualifiers that tell mailbox providers who should be sending mail on behalf of a domain.
While SPF works great in most situations, there are some circumstances where it doesn’t quite hold up, like with forwarded messages. Forwarded messages will have the same original sending domain, but it will likely be sent by a server that isn’t specified in the sending domain’s SPF record. The likely outcome is messages being tagged as spam unintentionally or the messages being dropped altogether.
But the biggest problem with SPF authentication is that bad actors can exploit it with a fake domain in the Return Path address and forging the From address to make the email look legitimate. That means SPF not the most effective way to stop brand spoofing.
Bottom line: While you definitely should authenticate your emails with SPF, you should also make sure to complete the other email authentication protocols to fill this gap
How Domain Keys Identified Mail (DKIM) works
DKIM authentication is an email authentication protocol that matches a public key with a private key to verify the message was authorized by the owner of the domain it was sent from. Your DKIM record acts as a digital signature that a mailbox provider can check when your message comes through so it knows it’s from you.
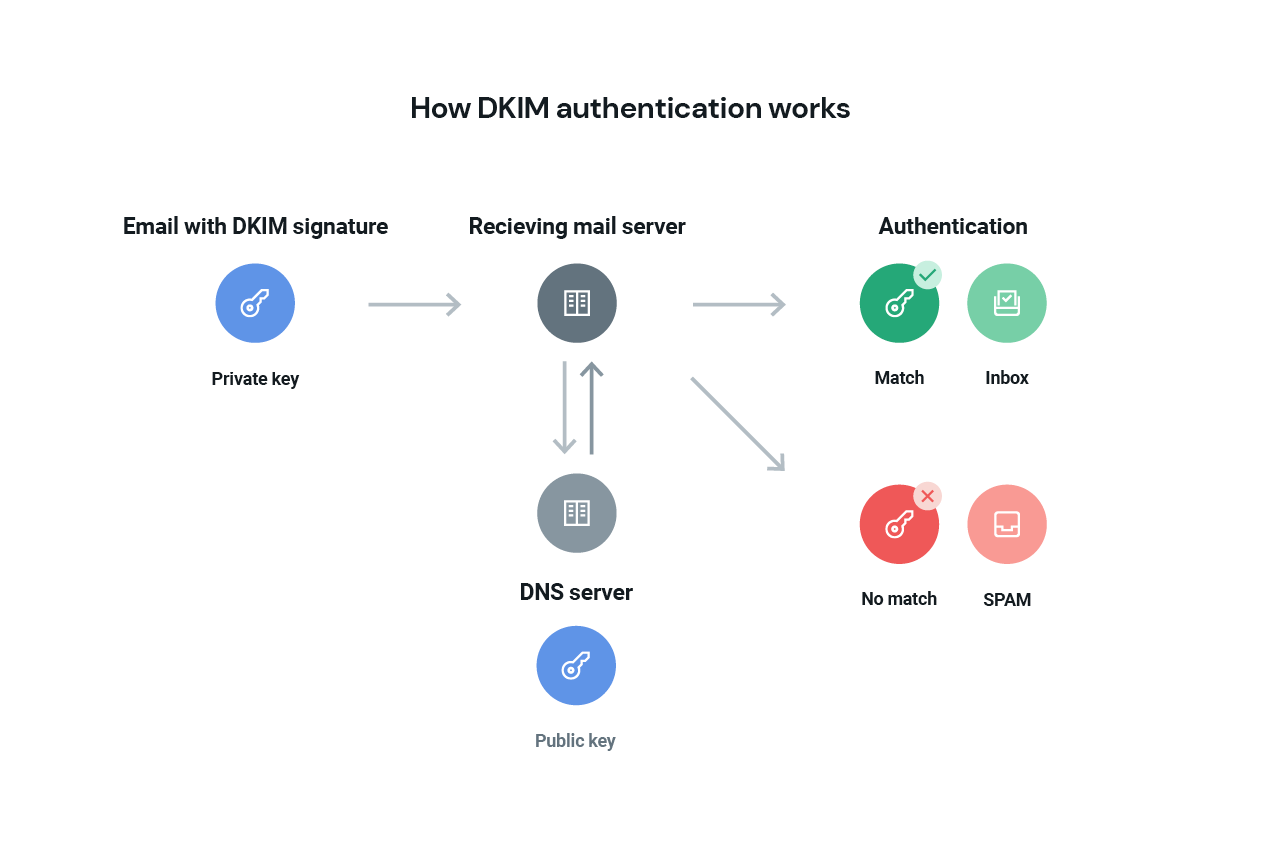
DKIM is an excellent resource for an email service provider (ESP) to track a domain’s reputation because signing messages via DKIM is considered authoritative. As an ESP, we take care of a lot of the DKIM heavy lifting on your behalf; however, there are some customization options you should know about.
At Mailgun, our standard recommendation is to have your sending domain be a subdomain off your main root domain. As such, our customers have the option of setting the DKIM authority to either be that subdomain or the root (with the caveat that both domains are set up within your Mailgun account.)
Let’s say your main root domain name is catzrule.org (because cats indeed rule), but you’ve set your Mailgun sending domain name as mg.catzrule.org. By default, our system will want to set the DKIM authority for both domains to catzrule.org. You can overrule that using our API and have mg.catzrule.org have its own value instead. This value can be changed at any time, but be aware that it can have ramifications for your domain reputation.
When you’re creating your DKIM record, in the signature, you can specify specific message header fields and components that you would like to sign against. However, the “From” field is the one message aspect that must be included in the signature. When in doubt, longer DKIM keys equal more protection from spammers. Our current default key size is 1024 bits, but we have recently updated our system to be able to generate and utilize 2048 bit keys. 2048 bit keys offer stronger encryption but will generate a larger TXT record as a result, so you may need to consult with your DNS service provider about formatting.
Creating your DKIM record varies by ESP, so that’s the best place to start. Here’s how to do it in Mailgun.
How Domain Message Authentication Reporting and Conformance (DMARC) works
There wasn’t anything to tie SPF and DKIM together until DMARC entered the picture. Domain-based Message Authentication Reporting and Conformance (DMARC) gives domain owners better control over SPF and DKIM and makes these policies easier to handle.
DMARC builds off the security protocols of SPF and DKIM and takes it a step further by giving domain owners the ability to outline how receiving servers should handle messages that fail authentication. You can’t set up a DMARC policy without first doing SPF and DKIM. The good news? Most ESPs cover the fundamentals of SPF and DKIM (you’re welcome!).
DMARC records cover three main areas:
Authentication: Signals whether SPF and/or DKIM authentication is in place for the domain.
Conformance: Suggests how to handle messages that fail to align with those protocols.
Reporting: Directs how to give feedback to the sender.
We’ll talk about each one:
Setting your DMARC policy
A DMARC policy is principally concerned with the alignment of the “From:” field with the authentication mechanisms listed in the SPF or DKIM policy for the domain. In other words, DMARC helps ensure recipients know exactly what to do with a message that fails either SPF or DKIM, while also letting the recipient notify the sender via the reporting function as to how the message performed.
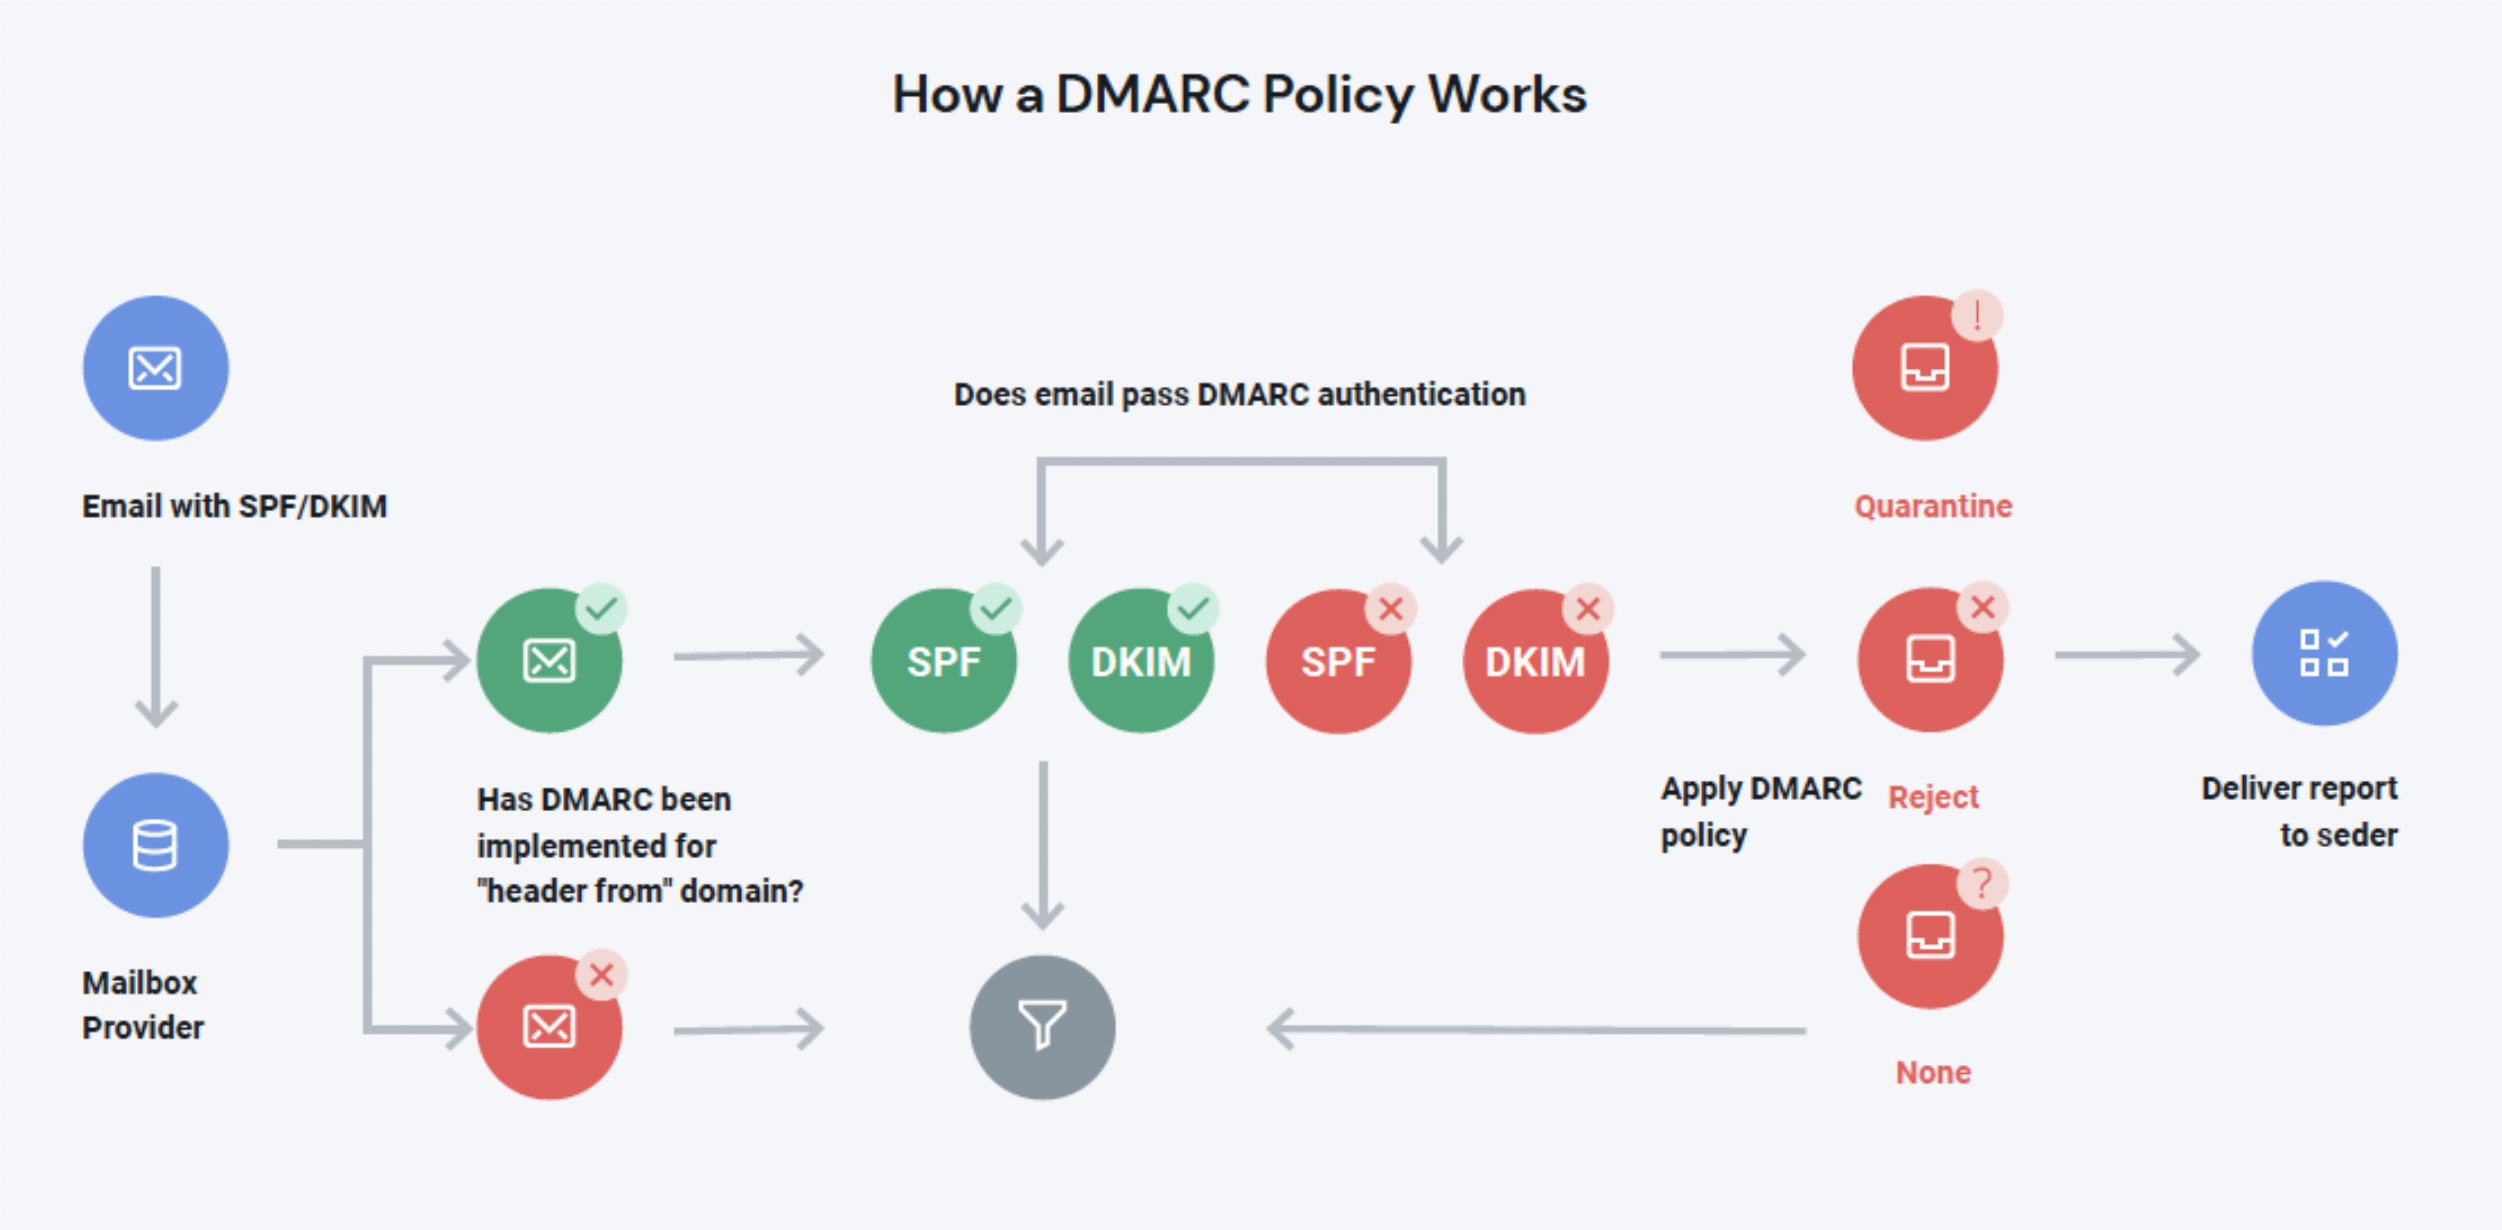
DMARC is a line of code added to your DNS record that is designed to help mailbox providers clean more spammers out of the inbox. Email marketers have three options when implementing a DMARC policy:
p=none, which ensures that messages are scanned according to your DMARC policy alignment specifications, but no action is taken on them. In other words, the none policy tells your recipient’s email provider not to take action against your message if DMARC fails.p=quarantine, which separates suspicious emails by placing them somewhere like a spam folder, instead of the inbox.p=reject, which tells the provider to block any email that fails DMARC. With the reject policy, a message failing DMARC will never see the inside of the inbox.
If this is your first time implementing DMARC, start with p=none as you QA. The value in using the none policy is that reports will still be generated for those domains. You can use reports to verify the SPF and DKIM alignment policies. Once you confirm DMARC is working as it should, you must update the policy and instruct receiving mail servers to either quarantine or reject failures moving forward.
According to dmarc.org, more than two-thirds of active DMARC policies are set to p=none. A relaxed p=none policy does nothing to make your authentication stronger or make the inbox a safer place for subscribers. With Gmail and Yahoo’s new authentication protocol requirements, the industry is moving to a p=reject policy norm.
“Currently, p=none is the minimum policy required by the new standards, but this is likely a way to ensure that all senders adopt DMARC in general. By the end of 2024, it’s possible (and we think likely) that both Gmail and Yahoo will be requiring stricter policies of p=reject which will put the responsibility on senders to instruct receiving mail servers to reject messages that fail authentication. ”
Kate Nowrouzi VP of Deliverability at Sinch
Setting your policy to p=reject signals to mailbox providers that you mean business. It’s the best way to protect your subscribers from spam and your brand from being spoofed. If you’ve set up your other authentication policies like SPF and DKIM, in addition to DMARC, then a p=reject shouldn’t hurt your chances of getting to the inbox. If anything, it will help.
"The end goal is ideally a policy of p=reject. That's what DMARC is for. Ensuring that your domain cannot be spoofed and protecting our mutual customers from abuse."
Marcel Becker, Senior Director of Product at Yahoo
Establishing reverse DNS/Pointer (PTR) Records
Setting up your reverse DNS/PTR records is step one when implementing DMARC. Reverse DNS works by resolving a domain’s DNS (name) to an IP address, rather than resolving an IP address to a domain name. The last point of authentication comes at the server end of things with Reverse DNS or Pointer (PTR) records.
All mail servers will have a sending IP address that is used to talk to other servers, but we also recommend that a human-friendly name is attached to that IP address. Reverse DNS records and PTR records make it easy to identify the server when looking at mail logs and email headers, so you don’t have to memorize IP addresses.
At Mailgun, all of our shared and dedicated IP space comes with a preconfigured PTR record. So, no matter your account or IP type, you are covered by default.
For accounts with dedicated IPs we offer assistance setting up a custom PTR record with your sending domain. This allows for a final layer of authentication at the IP level.
Choose your reporting structure
There are two types of DMARC reports that recipients can send to DMARC-authenticated domain owners:
Aggregate reports will usually be sent daily by recipient servers and collect various statistics for a sending domain. A typical aggregate report will be in XML format and include details on the sending IP, SPF/DKIM alignment passes or failures, and the header FROM domain, along with counts of each message.
Forensic reports show real-time DMARC message alignment failures, including a redacted copy of the original message which triggered the failure. Domain owners should utilize these ‘failure reports’ to understand their failures (message failures, not personal/professional) and address any issues uncovered.
Unlike SPF and DKIM, DMARC gives senders more insight into their deliverability – so regardless of what kind of reporting you choose, pay attention to what’s going on with your DMARC so you can address any issues before they hurt your sender reputation.
Implementing DKIM and DMARC is more important now than ever. As of Q1 2024, both Gmail and Yahoo will be activating some hefty updates regarding the responsibilities of senders. Proving authentications is a mandatory part of the update for both of these mailbox providers, but that’s not all. Learn everything you need to know in our Gmail and Yahoo mailbox updates post.
How Brand Indicators for Message Identification (BIMI) works
Unlike SPF, DKIM, and DMARC, BIMI is not required by Gmail and Yahoo (yet.) But wait! Don’t go – BIMI is one of the newest forms of authentication and the one that can help your brand in the inbox the most.
BIMI allows you to include a branded sender image using your brand’s logo along with your message. Not only does BIMI provide brand recognition at a glance, but it’s a DNS TXT record that provides additional authentication.

Think of BIMI as the icing on the cake. After you’ve jumped through the hoops and configured all your authentication standards, you become eligible for a BIMI record but there is a caveat. For BIMI to work, your DMARC policy must be set to either quarantine or reject.
We still recommend starting with p=none when you implement DMARC – this is a great way to test DMARC configurations and reporting, but it shouldn’t be your ongoing standard as it doesn’t protect against phishing or spoofing. BIMI requires p=quarantine or p=reject as part of a larger movement to enforce stricter DMARC policies.
Email authentication: The last defense
Email authentication isn’t just about securing your identity, it’s a deciding factor in message filtering. At the end of your email’s journey, when the ISPs are deciding whether to let your message into the inbox, authentication is what gets your message past spam filters and into subscribers’ inboxes. It’s a hot topic right now, and for good reason.
The real question isn’t whether or not to go through with the process of email authentication, but if you can afford not to.
Email authentication encompasses deliverability, reputation, and security. There’s a lot more to implementing and understanding email authentication protocols, and security goes far beyond authentication. Curious about other ways to secure your email program? We are too. So curious, in fact, that we gathered our most dedicated security and deliverability email geeks to put together a comprehensive guide. Check it out for everything you need to know about email security and compliance.
Learn about email security and compliance
Email security and compliance
Email security isn't easy. But you need to protect your business, brand, employees, and subscribers. Find out about the benefits of continually improving email security and compliance from our industry experts. It's yours to explore. No form filling required.

