Dev Life
Automating email infrastsructure monitoring with Mailgun’s event webhooks and Datadog
Have you ever set stock price alerts? Instead of constantly checking, you get a notification when your stock hits a certain price. That’s exactly how webhooks work – instead of repeatedly looking for updates, the receiving system is automatically notified by the sender when a specific event happens.
With Mailgun’s event webhooks, you can handle email-related events in real time. By configuring them in the Mailgun Control Panel, you can trigger HTTP POST requests to specified API endpoints whenever key email events occur. You can monitor deliveries, opens, and spam complaints in real time to track performance and resolve issues instantly. Webhooks also enable automation, triggers, retries, CRM updates, and handling unsubscribes as soon as an email event occurs – all without manual intervention.
In this article, you’ll learn how to use Mailgun’s webhooks to monitor your email events.
What are webhooks?
Webhooks are a lightweight way for applications to send event data in real time. They enable one system (the sender) to send an HTTP request to another system (the receiver) when a specific event occurs. Instead of the receiver constantly polling for updates, the sender pushes data automatically.
Mailgun’s webhooks notify your application when email events occur – such as deliveries, bounces, or opens – allowing it to process events as they happen. For example, if you’re sending promotional emails and want to track when customers click a link, Mailgun’s webhooks can notify you automatically. When a customer clicks a link inside the email, Mailgun detects this action and immediately sends a webhook to your server with details like the recipient’s email, the clicked URL, and the timestamp:
{ "event": "clicked", "recipient": "customer@example.com", "url": "https://yourstore.com/special-offer", "timestamp": 1739373700 }
Your system can then mark the customer as “interested” and trigger a follow-up email or assign a sales representative to engage with them. This real-time tracking helps businesses measure engagement and respond promptly to potential leads.
Mailgun triggers webhooks for the following email events: open, click, unsubscribe, bounce (both hard and soft bounces), failure, and delivery. To learn more about Mailgun’s webhooks, check out this guide.
Implementing email monitoring with Mailgun’s event webhooks
Mailgun’s webhooks let you track various email events. Integrating them with a monitoring tool like Datadog helps you visualize and manage the data in real time. You can also set up alerts for important events like clicks (indicating potential leads) or bounces and delivery failures – allowing you to respond quickly when needed.
Before you begin this tutorial, make sure you have the following:
- A Mailgun account to send emails via Mailgun’s API. If you don’t have an account, follow this quick start guide to set one up for free.
- A Datadog account to process Mailgun webhook events and set up alerts. If you don’t have an account, a free trial is sufficient for this tutorial.
- curl, a command line tool for sending emails with Mailgun’s API.
The Mailgun domain
To start, sign in to your Mailgun account and note down your sending domain, along with your region, from the Mailgun dashboard. If you’re on a free plan, you’ll see a sandbox domain, which will be used in the API endpoint as well as the “from” email address when sending emails through the Mailgun API. The sandbox domain follows the format sandbox<alphanumeric-id>.mailgun.org, like this:

Note: If you want to use your own custom email domain for sending emails through Mailgun, you’ll need a paid plan. The free plan only supports a sandbox domain and limits you to sending emails to up to five authorized recipients.
Enabling email tracking for your Mailgun domain
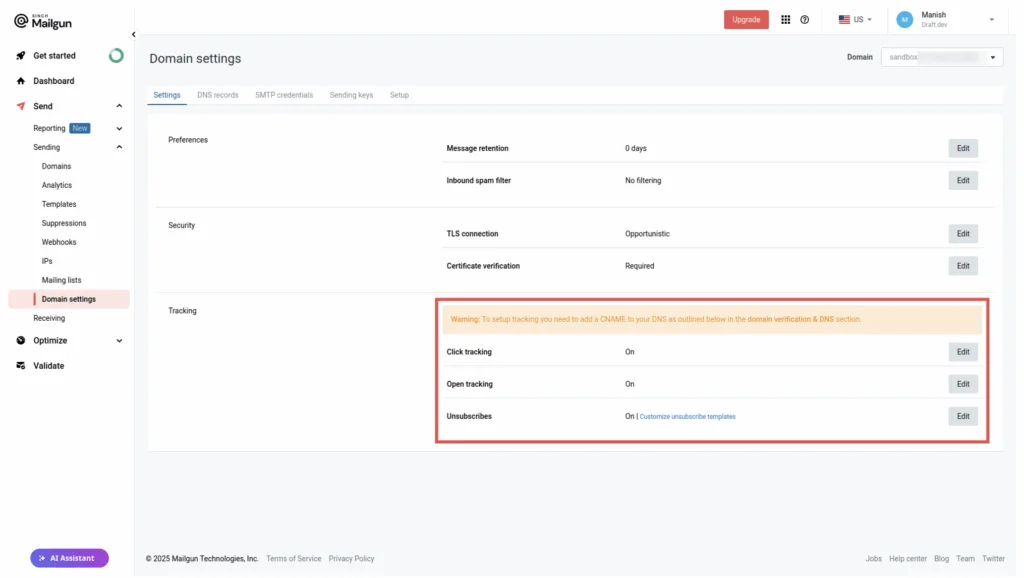
To monitor recipient engagement, you need to enable tracking for your Mailgun domain.
Navigate to Send > Sending > Domain settings in your Mailgun account. Under the Tracking section, ensure that Click tracking, Open tracking, and Unsubscribes are turned on:
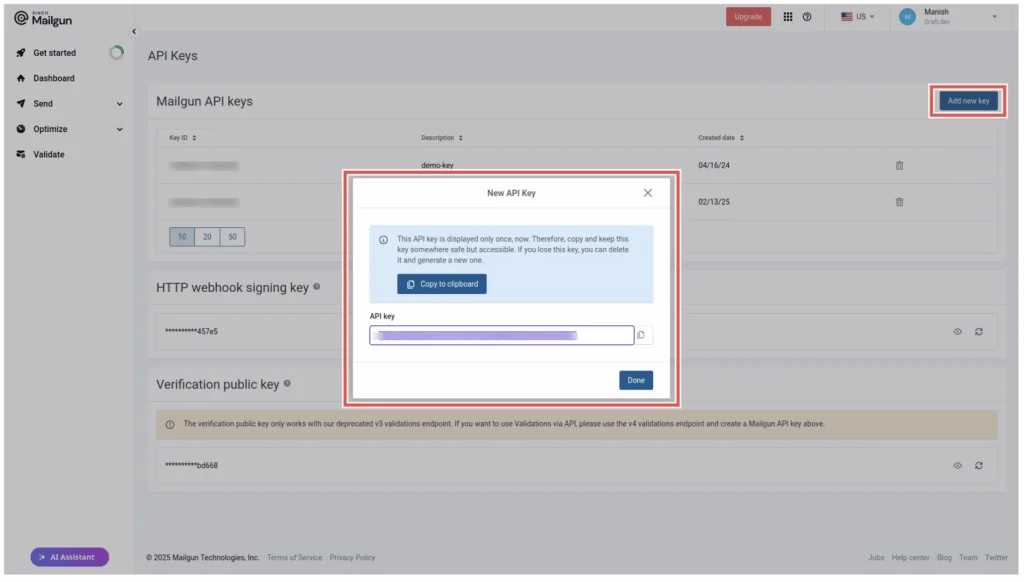
Obtaining a Mailgun API key
Next, create an API key from the API Security page, which is accessible via a drop-down menu under your name in the top-right corner. You’ll use this to set up your Datadog-Mailgun integration:
Datadog-Mailgun integration
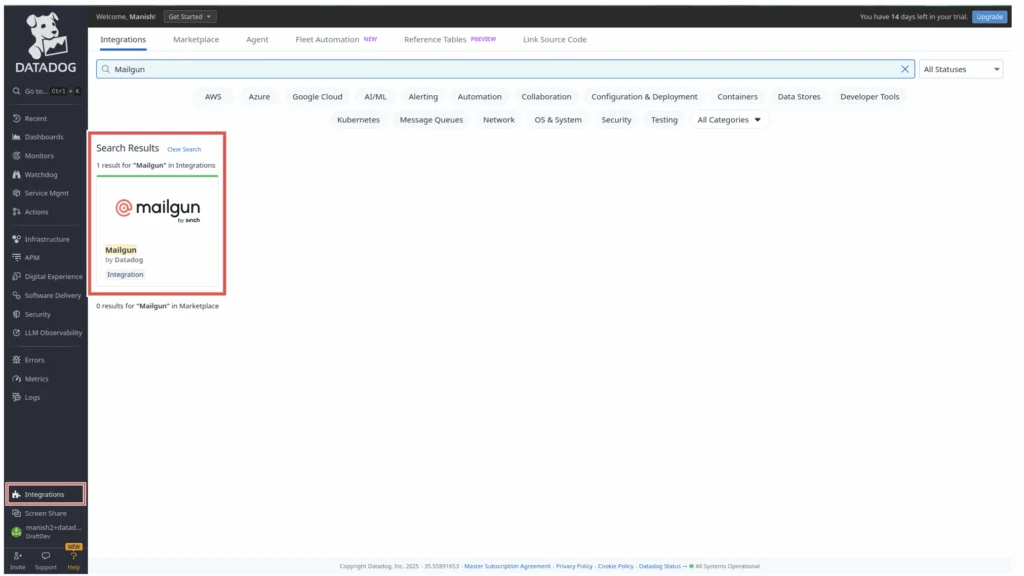
Once you have your Mailgun API key, sign in to your Datadog account and go to Integrations via the left-hand navigation pane (near the bottom).
On the Integrations page, use the search bar at the top to find the Mailgun integration:
Click Mailgun, then go to the Configure tab. Scroll down to the Mailgun Accounts section and click Add New. Enter your Mailgun domain, region, and API key, then save your settings.
Next, under the Logs Collection section, you need to configure an endpoint URL for Mailgun to forward event data as logs to Datadog. Mailgun webhooks require this URL to post event data.
To generate the webhook URL, either select an existing Datadog API key (one is created by default) or create a new one in the configuration pop-up, like this:
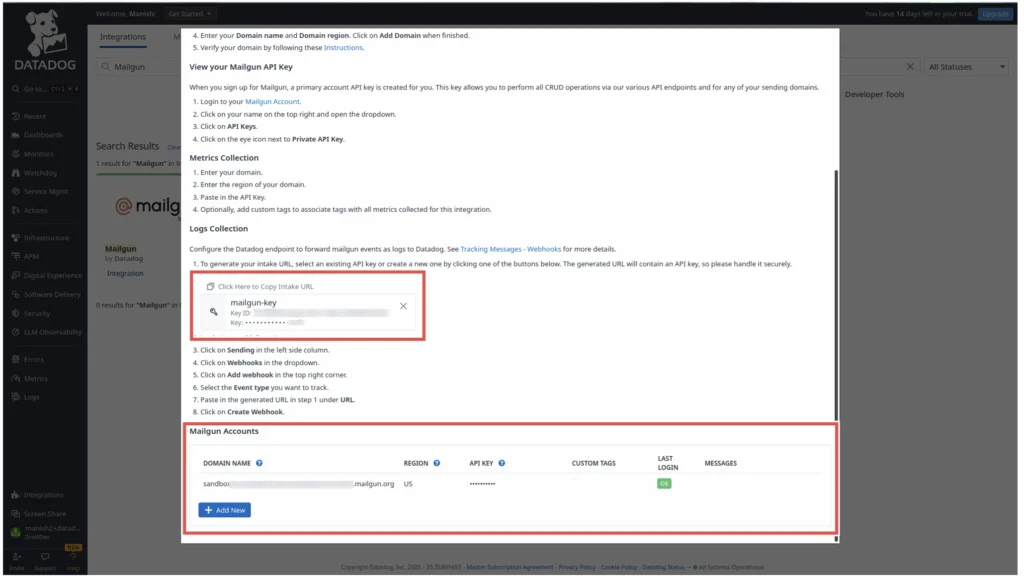
This generates a custom intake URL with your Datadog API key, similar to this:https://http-intake.logs.us5.datadoghq.com/api/v2/logs?dd-api-key=<datadog-api-key>&ddsource=mailgun
Copy and save this URL – you’ll need it when setting up Mailgun webhooks. Then, close the Mailgun integration pop-up.
For more details on the Datadog-Mailgun integration, check out the official documentation.
Creating Mailgun webhooks
In your Mailgun account, navigate to Send > Sending > Webhooks.
On the Webhooks page, click Add webhook in the top-right corner. Choose the event type you want to track, then paste the custom intake URL you generated from Datadog in the previous step and click Create webhook to save it. Repeat this process to create three separate webhooks for Delivered Messages, Opens, and Clicks:
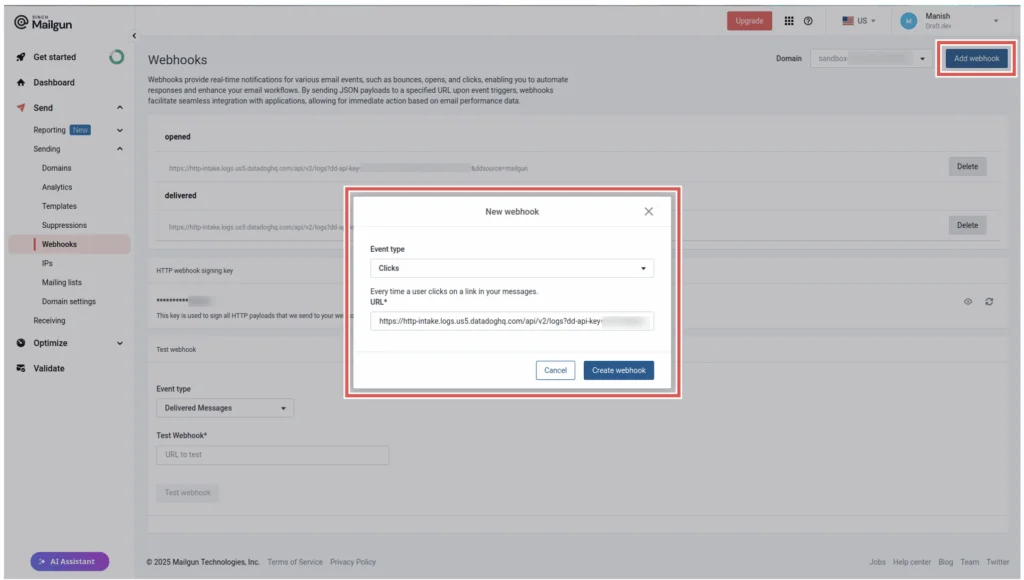
Now, every time one of these events takes place, Mailgun will automatically notify the Datadog URL with the relevant event data.
Sending emails via the Mailgun API
Mailgun allows you to send emails using its APIs. You can use the curl tool from your terminal to send a single email with the following command:
                                curl -s --user 'api:YOUR_API_KEY' \

https://api.mailgun.net/v3/YOUR_DOMAIN_NAME/messages \

-F from='User Name <email@YOUR_DOMAIN_NAME>' \

-F to=recipient@example.com \

-F subject="Exclusive 40% discount..." \

--form-string html='<html><body>As a valued customer, we're excited to offer you an exclusive 40% discount on <a href='https://example.com/awesome-product'>Our Awesome Product</a>. Grab it now!</body></html>' \

-F o:tracking-opens="yes"
Replace YOUR_API_KEY with your Mailgun API key and YOUR_DOMAIN_NAME with your Mailgun domain. This authenticates your request and ensures Mailgun knows the email is being sent by an authorized user.
Keep in mind the following:
- The from field must contain a valid email address from your Mailgun domain.
- The to field can be any recipient’s email address if you’re on a paid plan. On the free plan, it must be one of your authorized recipients.
- The
o:tracking-opens="yes"option instructs Mailgun to track open events for the email.
Note: The email message must be in HTML (not plain text) because Mailgun inserts an invisible tracking pixel to detect open events.
The HTML message also contains a link, and Mailgun tracks if the recipient clicks it (triggering a clicked event).
After your curl request runs successfully, Mailgun will respond with a message like this:
{"id":"<message-id>@<YOUR_DOMAIN_NAME>.mailgun.org","message":"Queued. Thank you."}
For testing, try sending emails to a few different recipients.
Monitoring email engagement with Datadog
To monitor your email engagement, log in to your Datadog account and go to the Dashboards section from the left navigation pane. Use the search bar at the top to find and select Mailgun Overview.
Datadog offers a ready-made dashboard that shows important email events – like deliveries, opens, bounces, and clicks – in real time, helping you monitor your email performance at a glance:
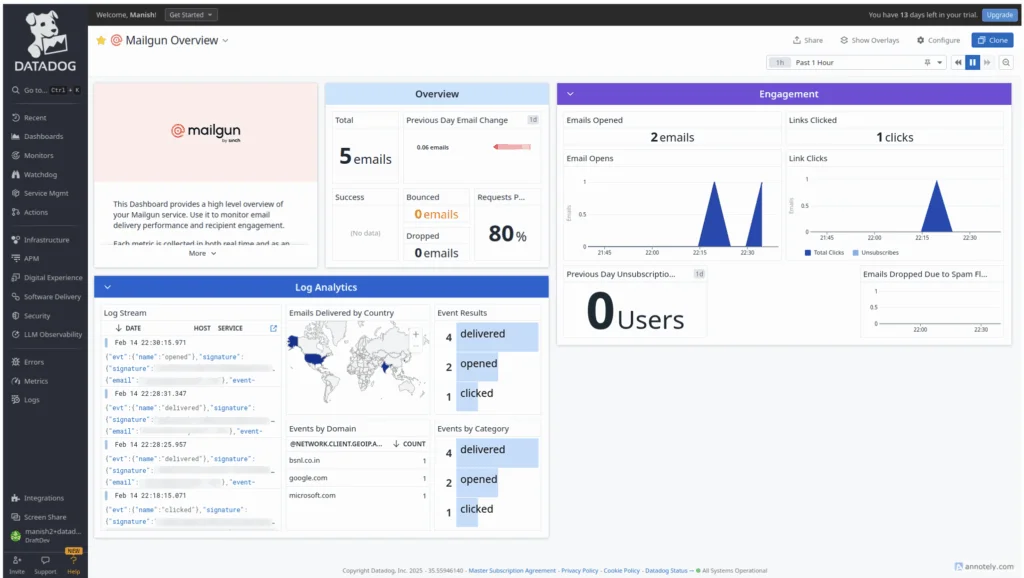
The dashboard displays key metrics like the number of emails delivered, emails opened, and links clicked. It also provides other useful analytics, all based on the event data received from Mailgun webhooks.
Setting up a Datadog monitor for Mailgun clicked events
Let’s say you want to capture leads from your email campaign by tracking everyone who clicks a link in your email. Instead of constantly checking the dashboard, it would be better if you got an email notification whenever a click happens.
Datadog allows you to set up monitors that can automatically trigger alerts based on Mailgun’s webhook events. Here’s how you can create a log-based monitor in Datadog that listens for Mailgun clicked events:
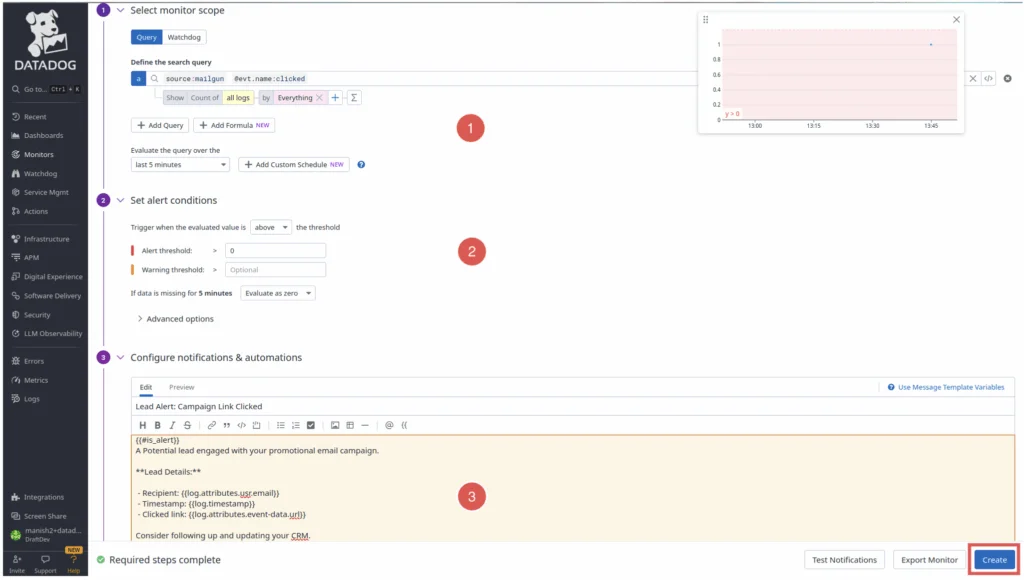
In the left navigation panel, click Monitors, then click New Monitor. Under the monitor types list, select Logs, then click Configure Logs Monitor at the bottom right. Enter the following search query:
source:mailgun @evt.name:clicked
This will filter your Mailgun logs to only consider clicked events.
Choose an evaluation time window, such as five minutes or any suitable interval based on how frequently you want to check for clicks.
In the Set alert conditions section, set the trigger when the evaluated value is above the threshold. In the Alert threshold field, set the condition to greater than 0. Keep the other values unchanged. This ensures that the monitor triggers when a clicked event is detected in the selected evaluation period of five minutes.
In the Configure notifications & automations section, set the title as “Lead Alert: Campaign Link Clicked” and the monitor message as follows:
{{#is_alert}} A Potential lead engaged with your promotional email campaign.
**Lead Details:**
– Recipient: {{log.attributes.usr.email}} – Timestamp: {{log.timestamp}} – Clicked link: {{log.attributes.event-data.url}}
Consider following up and updating your CRM.
—
This notification is generated by Maligun-Datadog integration.
@<notification-email-address-here> {{/is_alert}}
The enclosing {{#is_alert}}...{{/is_alert}} block ensures that this message is only sent when the monitor is triggered (when a click is detected) and not otherwise for recovery. The values in {{...}} blocks contain details from the corresponding event data.
In the @ Add Mention field, enter the email addresses that will receive this notification, such as for your CRM team.
Finally, review your monitor configuration and click Create to finish.
This monitor will trigger whenever a clicked event from Mailgun webhooks is detected in your Datadog logs. Your notification email addresses will receive an email with the lead details. This setup automates lead detection from your email campaigns without manually monitoring dashboards.
Did you know? You can also send monitor notifications to Slack, Jira, Microsoft Teams, and other services through Datadog, if needed.
Testing the Mailgun-Datadog automation
With everything set up, it’s time to test how Mailgun webhooks and Datadog work together to alert you when a clicked event takes place.
Open one of the test emails you sent earlier using the curl command and click the link in the email to simulate a recipient engaging with your campaign.
Mailgun will detect the clicked event and trigger the webhook, sending the event data to Datadog as a log entry.
Since your monitor is set up to watch for clicked events, Datadog will evaluate the condition and trigger an alert email containing important lead information, such as the recipient’s email, the timestamp, and the clicked URL.
Here’s an alert email sent by this Datadog monitor:
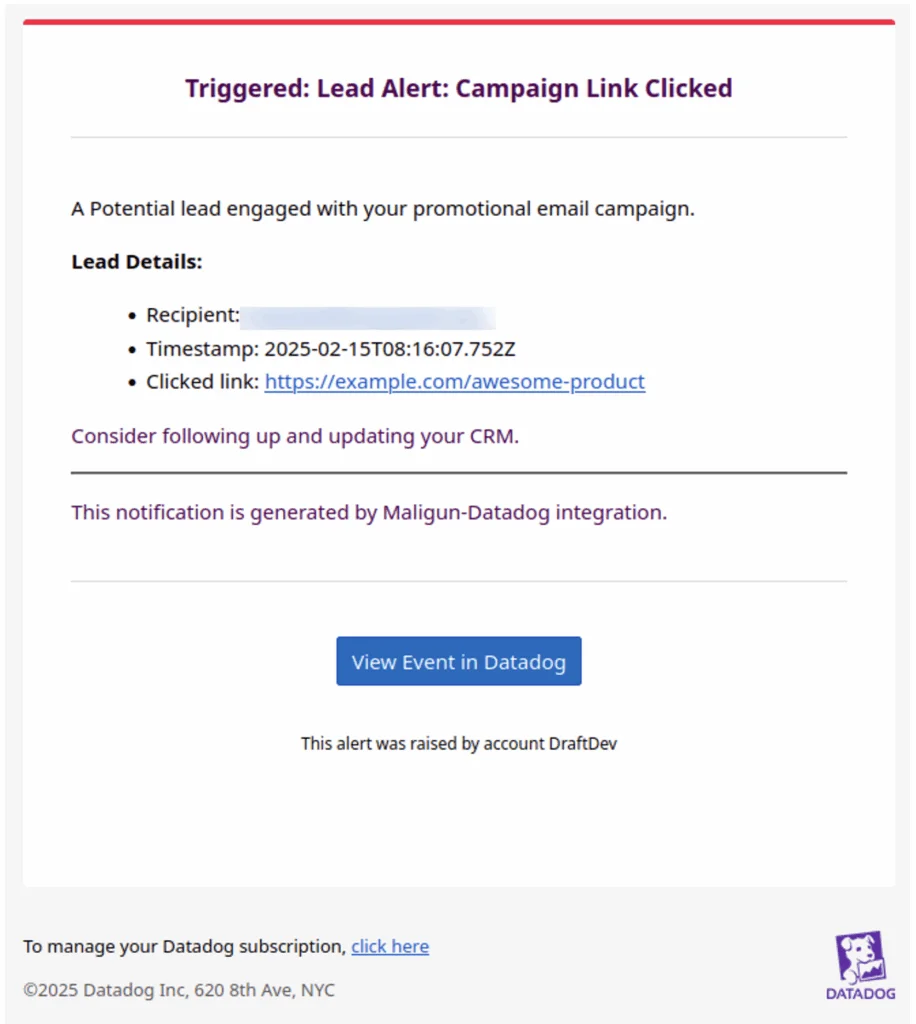
This fully automated system not only tracks email engagement but also alerts you in real time when a potential lead interacts with your Mailgun campaign. Likewise, you can automate notifications for email events like bounces and failures for your SRE teams.
Deleting Mailgun webhooks
If you no longer want to track a specific email event, you can delete its corresponding webhook in Mailgun.
Simply go to Send > Sending > Webhooks in your Mailgun account, locate the event you want to stop tracking, and click Delete next to it. You’ll be asked to confirm the deletion; once confirmed, the webhook will be deleted, and Mailgun will stop sending event data for that particular event type to your endpoint.
Wrapping up
In this tutorial, you learned how Mailgun webhooks can send event data for various email interactions like deliveries, opens, clicks, spam complaints, and failures. You explored how to integrate these webhooks with Datadog to build an automated system for monitoring email engagement and receiving notifications.
Did this help? Be sure to subscribe to our newsletter to get updates on tutorial content and email and deliverability news from our email geeks!