Dev Life
How to authenticate your email for better delivery rates

When building applications that send emails—like marketing platforms or CRM systems—your users need confidence that messages will reach their inbox. But with evolving anti-spam measures, even legitimate emails can face roadblocks.
Email authentication protocols like SPF, DKIM, and DMARC verify sender identity, prevent spoofing, and support a strong sender reputation. This post explains how these protocols work, how to configure them, and how to confirm they’re set up correctly—so your emails get delivered as intended.
Why email deliverability matters
If your application offers email functionality, you need to make sure they’re actually delivered. Misconfigured authentication shouldn’t leave users thinking messages were sent when they weren’t.
Authentication configuration problems can result in high bounce rates, spam complaints, and blocklisted IP addresses. It also opens you up to email spoofing and phishing attacks, which can have an impact on your sender’s reputation and organizational security posture.
Deliverability issues can also eat into your developers’ time, impacting productivity. Consider cases where intermittent delivery issues are escalated through customer support to the development team. Developers then have to stop what they’re doing and find out what happened to the affected emails – whether they bounced or faced other delivery issues. Diagnosing such issues can be very time-consuming and can kill productivity if they’re a regular occurrence.
Luckily, none of these are new problems, and there are solutions you can adopt to improve your email deliverability. Email authentication protocols (including SPF, DKIM, and DMARC) can be used to mitigate these issues. And, when you use them together, you can put your email-sending application in the best position to s쳮d with reliable, trusted email delivery.
Authenticating your email for better delivery rates
SPF is a mechanism that allows you to define DNS records that track which servers are allowed to send emails on behalf of your domain. Without SPF records, anyone would be able to send spoofed emails pretending to be from your domain, and there would be no way to verify their claims. Similarly, misconfigured SPF records can be problematic: You might send a legitimate email from your own domain, but if the SPF records are not configured to include the sending server as a valid source, the email is likely to get flagged as spam or rejected.
Setting up SPF
To check if your domain has SPF records already, you can use a tool like MxToolbox. Or, if you prefer the terminal, you can use the dig command, like this:
$ dig +short TXT yourdomain.com | grep spf
If you’re missing an SPF record, you won’t see any output. However, if you already have a record, you should see something like this:
v=spf1 include:mailgun.org ~all
There are three key components to this record:
v=spf1denotes the version of the SPF protocol being used. All SPF records should start with this tag.include:mailgun.orgspecifies that the domainmailgun.orgis allowed to send emails on behalf of your domain. When the receiving mail server receives an email frommailgun.org, it checks for an SPF record that includes this to validate the sending server. Note that you can include multiple domains here if desired, likeinclude:mailgun.org include:google.com.~allspecifies the policy for emails that do not match the SPF rules. In this case,~denotes a “soft fail,” where emails not matching the policy should be accepted but marked as suspicious rather than outright rejected. Alternatively, you could use -all to specify a “hard fail” for emails that do not match the policy.
Creating an SPF record
Now that you understand the components of an SPF record, creating a record for your domain is simply a matter of adding a new TXT DNS record.
If you’re unsure how to do this, the Mailgun Help Center has guides for the following DNS providers:
If you already have an SPF record and need to add a new domain, be aware that you cannot add multiple SPF records for the same domain. Instead, you need to modify your existing record and add a new value to it. For instance, if your current SPF record is v=spf1 include:example.com ~all and you want to add mailgun.org, your new record would be v=spf1 include:example.com include:mailgun.org ~all.
While basic SPF records are fairly simple to create and manage, they can introduce friction for developers when you need to manage SPF records for multiple sending services. For instance, if you have marketing tools, CRMs, and messaging services all sending emails from the same domain, you might end up with long, complex SPF records.
The SPF protocol also has a limit of 10 DNS lookups, where only the first 10 lookups in your SPF record will be actioned. If the email is not matched within these 10 lookups, it will be treated as unauthenticated. When this happens, there are a few things you can try:
- Dedicated subdomains: You can assign each sending service a dedicated subdomain and then define simple SPF records on each subdomain. This makes managing large numbers of sending services easier and bypasses the lookup limit, as each record is minimal.
- SPF record flattening tools: Tools exist to flatten SPF records down to IP addresses or IP ranges, which can help deal with the lookup limit. However, this can introduce new issues, so dedicated subdomains may be preferred.
Configuring DKIM
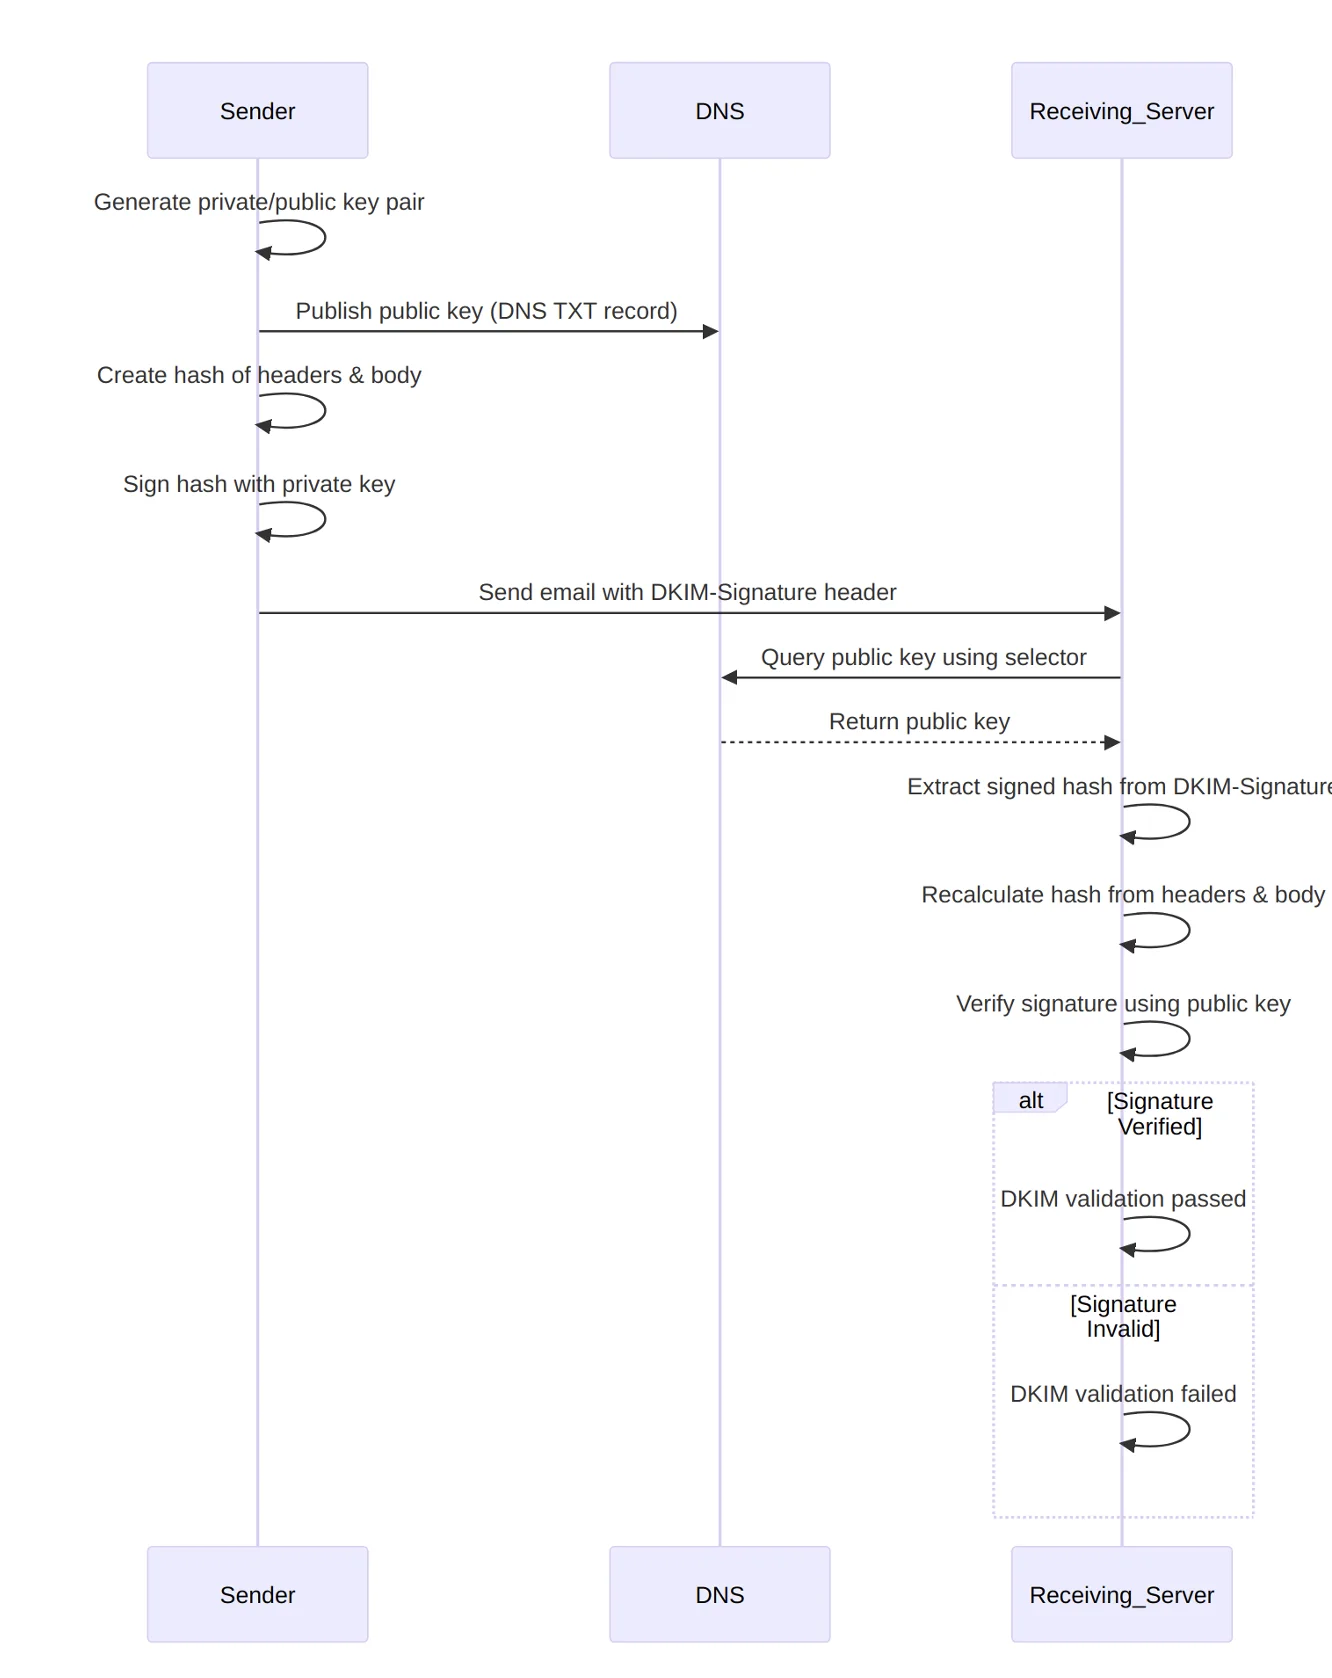
DKIM is an email authentication protocol that allows you to attach a digital signature to emails to allow for the identification and prevention of tampering. When an email is signed with DKIM, the following flow takes place:
DKIM’s primary purpose is to prove that an email has not been tampered with and has arrived with the original content sent by the signing sender server. However, as a side effect, it can also help reduce the odds of the email being marked as spam based on content heuristics. This is because consistently validating emails with DKIM will improve your sender reputation over time, which will ultimately reduce spam filters’ dependence on content-based spam flags.
Checking if you have DKIM configured on a domain is slightly more complex than checking SPF because the DNS record for DKIM exists on a special subdomain that uses an arbitrary “selector.” Since the selector can be any alphanumeric string, the only way to determine which one to check is the same method used by the receiving server – by examining the DKIM-Signature header in the email. If you look at the raw content of an email that was signed with DKIM and search for this header, you’ll see something like this:
DKIM-Signature: v=1; a=rsa-sha256; c=relaxed/relaxed; d=example.com; s=dkim; t=1672618838; h=from:from:reply-to:subject:subject:date:date:message-id:message-id:to:to:cc:mime-version:mime-version:content-type:content-type:content-transfer-encoding:content-transfer-encoding:in-reply-to:in-reply-to:references:references; bh=RKkrHxZminSEI0rxtiN3+8wFv6vKCozhmrATLVIZFcw=; b=lndiW4xUpmGqbbIxjiER0FEa67zPqpmW+MqrmMcvuvgd+Gta851Jd+lU4yJ4rmiCHSPfRA gDh+ZsPC8UWZ8U5cfg14uFuvtxUWr6N9Ncy1mntgz7ZNhMIovpknioDIOLYD2wM72mglVP BAeTy2oHVZ0B6tBQqC4/hePtzyF0dnU=
This header is made up of several components:
| Component | Purpose | Example Value |
|---|---|---|
| v | DKIM version | v=1 |
| a | Signing algorithm | rsa-sha256 |
| c | Canonicalization method | relaxed |
| d | Signing domain | example |
| s | Selector for DNS public key lookup | dkim |
| t | Timestamp | 1672618838 |
| h | Headers included in the signature | from:reply-to:subject:date:message-id:to:cc:mime-version:content-type:content-transfer-encoding:in-reply-to:references |
| bh | Body hash | RKkrHxZminSEI0 |
| b | Cryptographic signature | lndiW4xUpmGq |
The receiving server needs this information to verify the email. It recomputes the email’s hash, including the headers specified in the h component, and retrieves the public key from the DNS record using the selector in the s component (dkim, in this case). When the selector is combined with the sender domain, the full DKIM key location would look like this:
For instance, if your selector was dkim and your domain was example.com, the DNS record would be located at dkim._domainkey.example.com. In this case, you could view the DNS record either using an online tool or dig:
$ dig +short TXT dkim._domainkey.example.com
If a record is found, your output will look like this:
v=DKIM1; k=rsa; p=MIIBIjANBgkqhkiG9w0BAQEFAAOCAQ8AMIIBCgKCAQE...
This record has three components:
v=DKIM1specifies the DKIM version.k=rsadefines the key type (RSA is standard).p=contains the public key.
Creating DKIM keys
When setting up DKIM, you need to generate a key pair consisting of a public and private key. The sending server uses the private key to sign emails, and the public key is published as a DNS record and used by the receiving server to validate those emails.
Typically, if you’re setting up DKIM for an email-sending service, the service generates the keys on your behalf (or allows you to use your own, in some cases). For instance, Mailgun provides step-by-step instructions on how to generate and configure DKIM records for a given domain. However, it’s good to understand the underlying process, and in some cases, you may prefer to take full custody of the key pair.
For this example, you can generate the key pair using a tool like openssl. First, generate the private key like this:
openssl genpkey -algorithm RSA -out private.key -pkeyopt rsa_keygen_bits:2048
This command creates a file called private.key containing the RSA private key. Next, you can use this private key with openssl to create the public key:
openssl rsa -pubout -in private.key -out public.key
Once you have the public key, you can create the DNS record for it with your selector of choice (dkim, in this case). The DNS record would look like this:
dkim._domainkey.example.com. IN TXT "v=DKIM1; k=rsa; p=MIIBIjANBgkqhkiG9w0BAQEFAAOCAQ8AMIIBCgKCAQE...etc"
Similar to SPF, DKIM can introduce complexity for your developers. Challenges may arise, such as mismanaged private keys and conflicts between sender services.
The protection DKIM offers is only as good as your key management practices. A compromised signing key could expose you to bad actors and spoofed emails. As such, you must exercise good security hygiene when dealing with private keys, storing them securely with a service such as AWS Secrets Manager or HashiCorp Vault. Likewise, it’s often a good idea to rotate signing keys regularly, since this limits the potential impact of a compromised key. The fact that DKIM selectors are arbitrary is useful here, as you can start sending emails with a new selector, signed with a new private key, while you phase out your old key pair.
Implementing DMARC
DMARC is another email authentication protocol designed to help mitigate spoofing, phishing, and spam. DMARC builds on top of SPF and DKIM. Specifically, DMARC uses SPF and DKIM to perform checks on incoming emails and enforce the defined DMARC policy in accordance with the outcome of those checks.
DMARC also performs an alignment check for SPF and DKIM, ensuring that the domain specified by those mechanisms also matches the domain in the from: header of the email, further tightening things up to prevent spoofing.
DMARC records are published at a well-known subdomain (_dmarc) of your sending domain. For instance, if you wanted to check the DMARC record of example.com with dig, you’d run a command like this:
$ dig +short TXT _dmarc.example.com
If you had a record configured for this domain, your output would look like this:
"v=DMARC1; p=quarantine; pct=100; adkim=s; aspf=s"
This example record contains five components. However, there are more possible components a DMARC record can include:
| Component | Purpose | Example Value(s) |
|---|---|---|
| v | Version of DMARC | Always DMARC1 currently |
| p | Policy to apply for noncompliant emails | Possible values are none, quarantine, or reject |
| rua | Reporting URI for aggregate reports (email addresses where reports are sent) | mailto |
| ruf | Reporting URI for forensic reports (email addresses where detailed reports are sent) | mailto |
| adkim | DKIM alignment mode | r for relaxed, s for strict |
| aspf | SPF alignment mode | r for relaxed, s for strict |
| pct | Percentage of emails subjected to DMARC policy | 0–100 |
| fo | Forensic reporting options | 0 for “all failures,” 1 for “DKIM failure only” |
A key concept for DMARC is the idea of “alignment.” Alignment determines how closely the domains used in SPF and DKIM need to match the domain in the email’s from: header. The alignment mode is controlled by the adkim and aspf components of the DMARC record, and they have the following meanings:
- DKIM alignment:
- Strict
(adkim=s):The domain in the DKIM signature (d=) must match exactly with thefrom:address. - Relaxed
(adkim=r):The domain in the DKIM signature must share the same organizational domain as the domain in thefrom:address. This means subdomains are permitted.
- Strict
- SPF alignment:
- Strict
(aspf=s):The domain in the SPFReturn-Pathmust match exactly with thefrom: address. - Relaxed
(aspf=r):The domain in the SPFReturn-Pathmust share the same organizational domain as the domain in thefrom:address. Subdomains are permitted.
- Strict
Assuming SPF, DKIM, and DMARC are all configured correctly when an email is sent, the following sequence of events will take place:
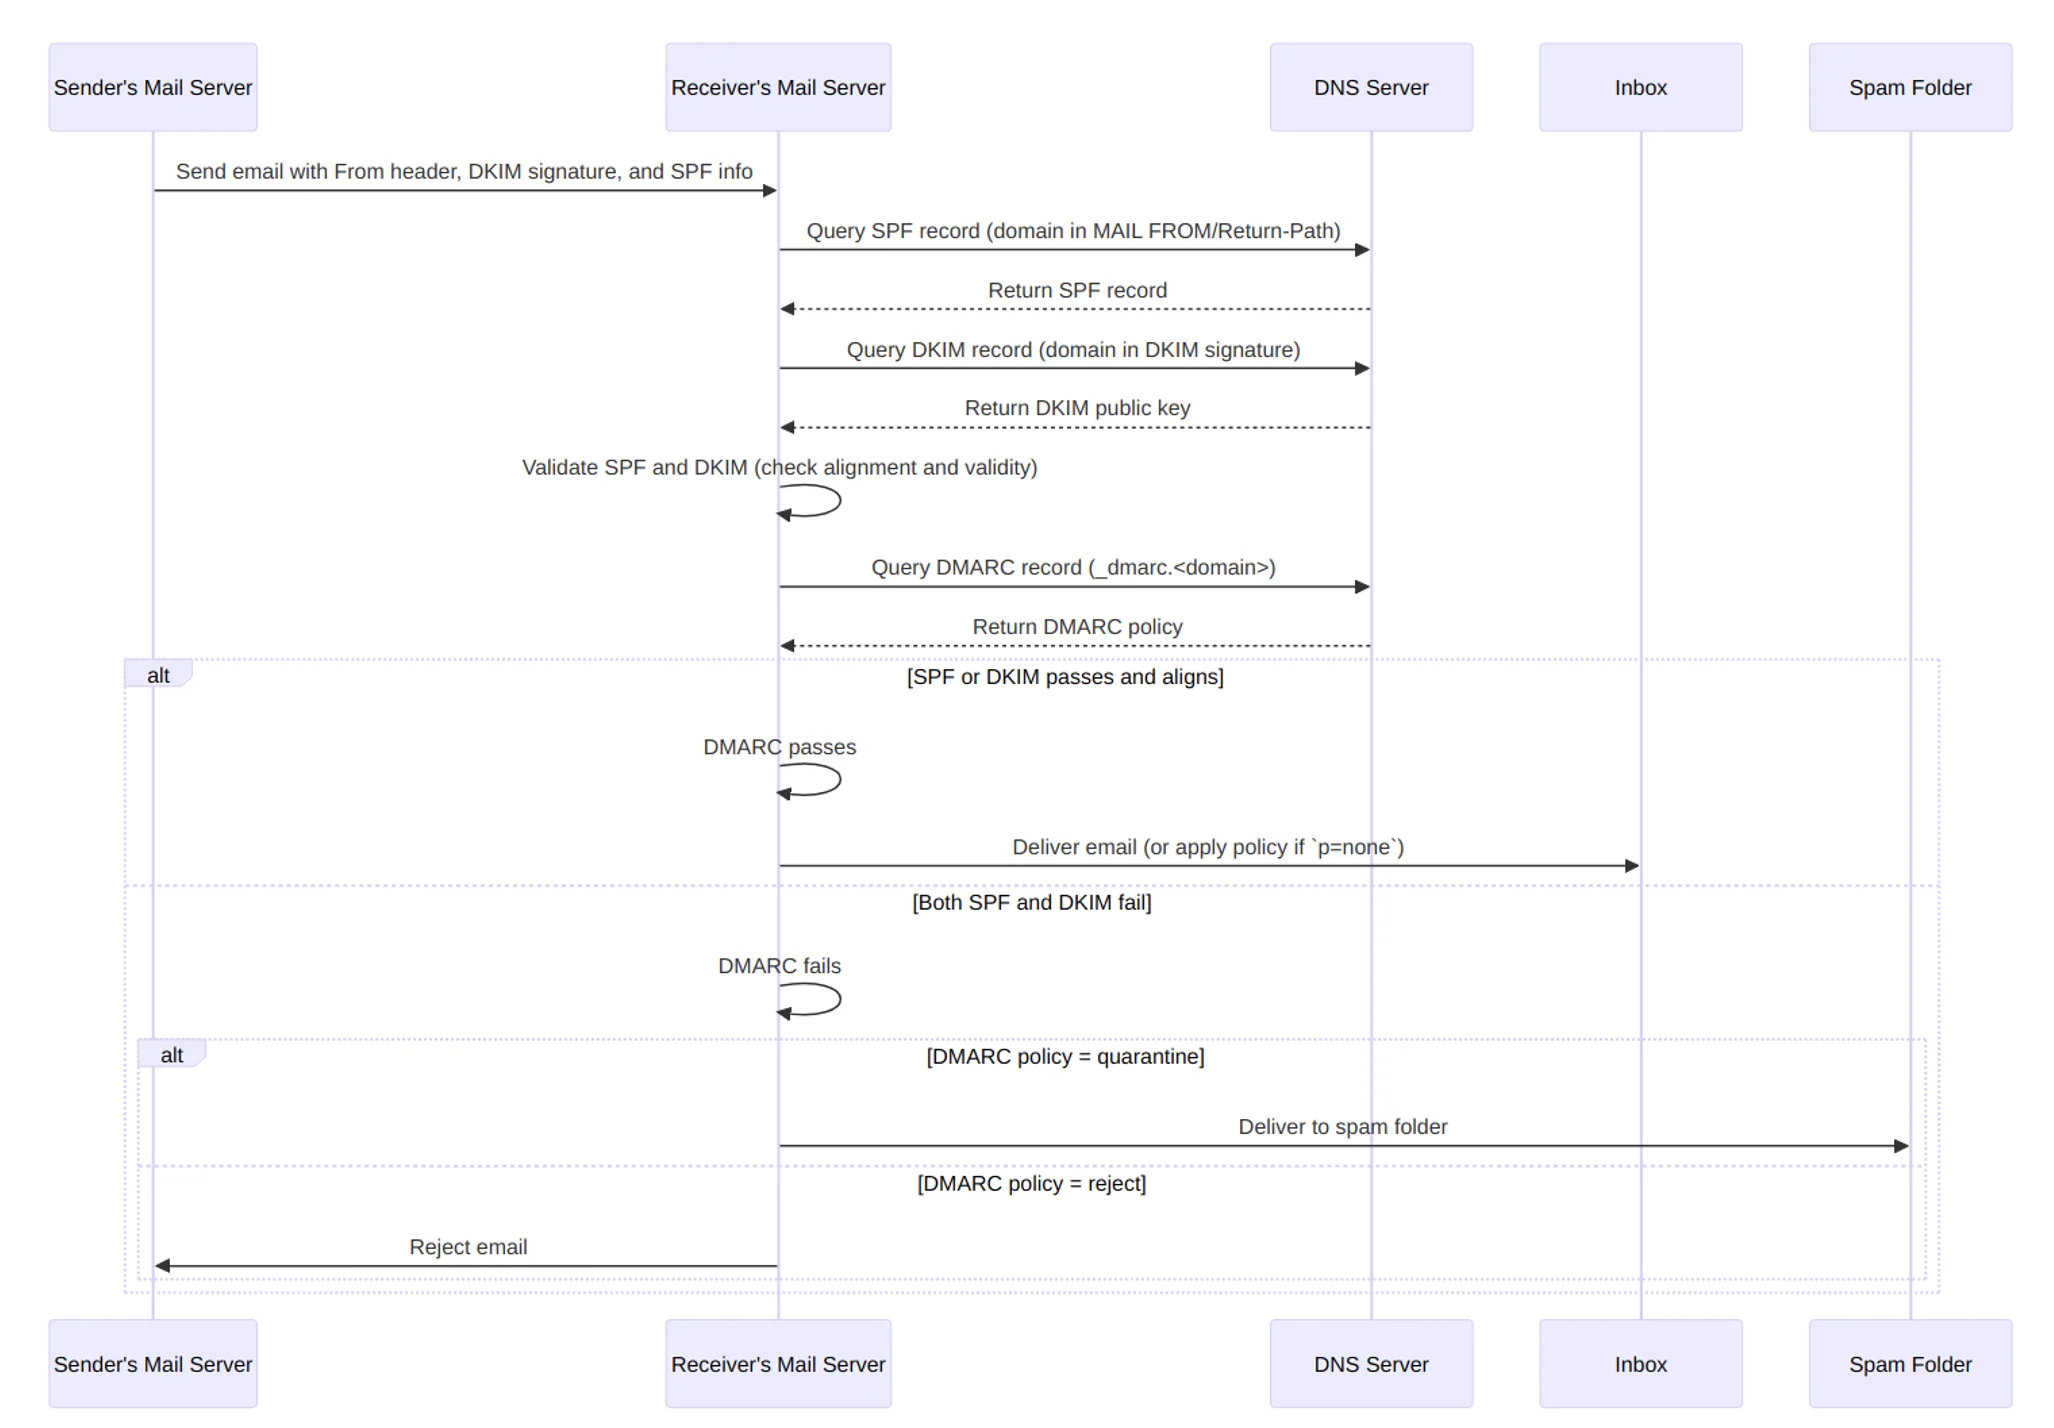
DMARC is considered to have passed if either SPF or DKIM is valid and aligned. If both of them are invalid and/or unaligned, then DMARC is considered to have failed, and the DMARC policy is enforced.
The policy is defined by the p= component and has three possible modes:
p=none:No action is taken, but reports are generated.p=quarantine:Emails are treated as suspicious and are sent to the spam folder.p=reject:Emails are rejected and not delivered.
Remember, the DMARC policy you define does not affect your incoming emails; it tells the rest of the world what they should do with unauthenticated emails that claim to have come from your domain. This includes the aggregate (rua) and forensic (ruf) report tags, which specify where receiving servers should send compliance reports regarding unauthenticated emails claiming to come from your domain.
It’s important to set these options and make sure the inboxes they point to are actively monitored, as these reports are invaluable in understanding your domain’s email usage, identifying unauthorized senders, and refining your authentication settings.
As with the other email authentication mechanisms that have been covered, setting up your DMARC record is simply a matter of creating the appropriate TXT DNS record, which would look something like this:
_dmarc.example.com IN TXT "v=DMARC1; p=reject; rua=mailto:dmarc-reports@example.com; ruf=mailto:dmarc-failures@example.com; aspf=s; adkim=s; pct=100"
Be mindful that if you’re setting up email authentication for a domain for the first time, it can be beneficial to ease into it. Rather than starting with strict enforcement (p=reject), you may want to start with gradual enforcement (p=none) and monitor the DMARC reports to make sure your emails are passing validation as expected. Otherwise, a misconfiguration could impact the deliverability of your legitimate emails.
Wrapping up
Email authentication protocols like SPF, DKIM, and DMARC play a major role in ensuring your emails’ deliverability and protecting your domains’ reputation. Properly configured email authentication builds trust and enhances your sender reputation, reducing the chances of your emails being marked as spam.
If you haven’t configured or recently reviewed your email authentication settings, you should take some time to review and implement these steps for your email infrastructure. Remember to actively monitor your DMARC reports and test your emails’ deliverability to ensure everything is configured correctly. If you need a reliable resource for testing and managing your email deliverability, Mailgun has you covered.