Dev Life
Building transactional email workflows for password resets with Mailgun’s API
Transactional emails are automated emails triggered by user actions on a website, app, or service. Unlike marketing emails, which promote products or services, transactional emails provide essential, often real-time information.
Transactional email workflows take this further by automating a sequence of emails based on user actions to ensure timely communication and a smooth user experience. Companies rely on services like Mailgun for transactional emails because they’re prompt, relevant, and triggered by immediate user actions. For example, the workflow allows a user to quickly reset their password and regain access to their account.
In this tutorial, you’ll learn how to build a transactional email workflow for password resets with Mailgun’s API.
Setting up a Mailgun account
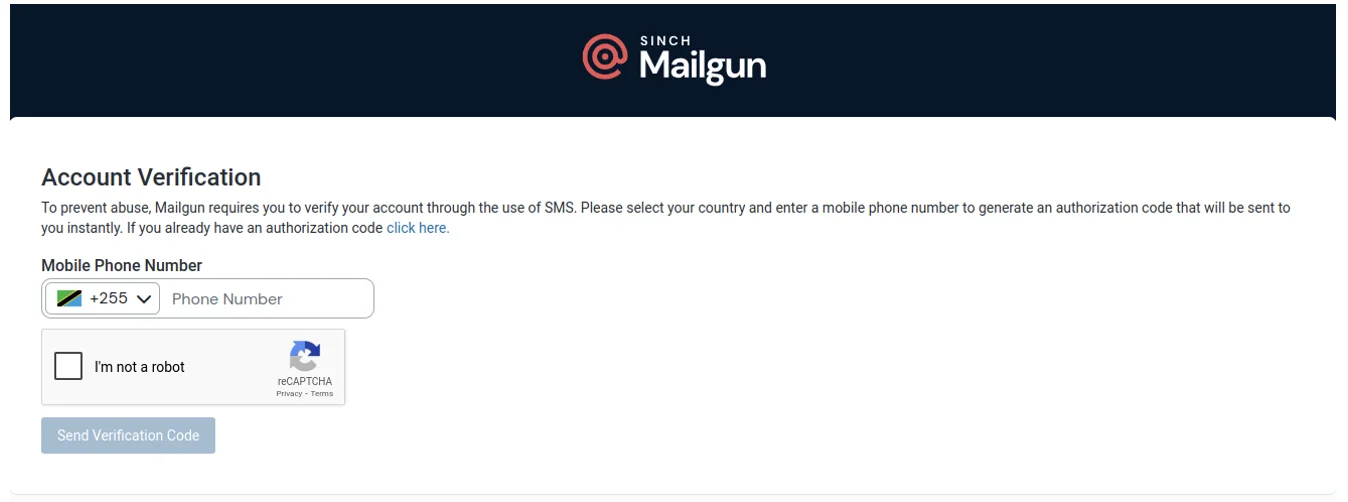
If you don’t already have a Mailgun account, the first thing you need to do is create one. Make sure to check the email associated with your Mailgun account and verify your account:

Next, input your phone number and the provided authorization code to activate your account:
Once your Mailgun account is set up, it’s time to obtain an API key to start using the service.
Obtaining an API key
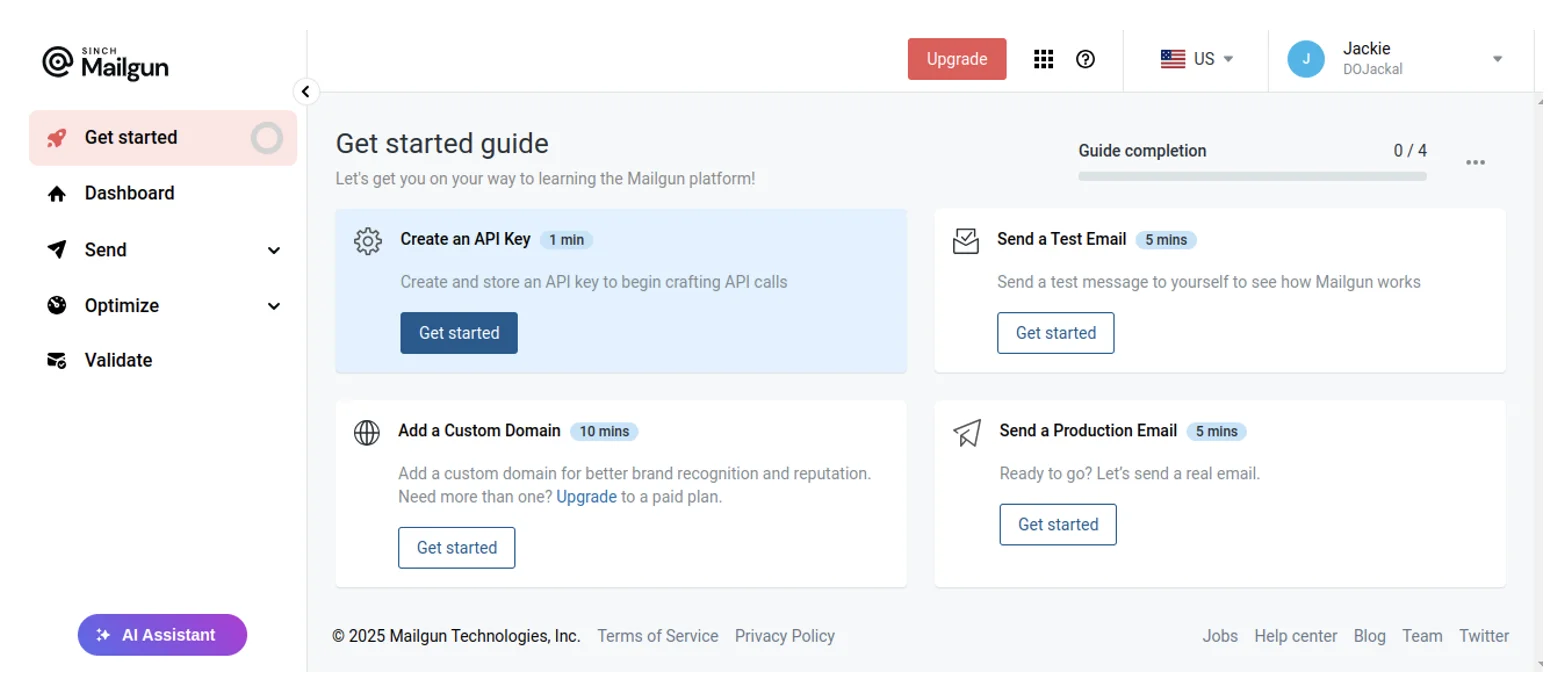
For your application to interact with Mailgun’s services, it needs to be authenticated via an API key. To get your API key, navigate to the Mailgun dashboard and select Get started on the left to view a Get started guide:
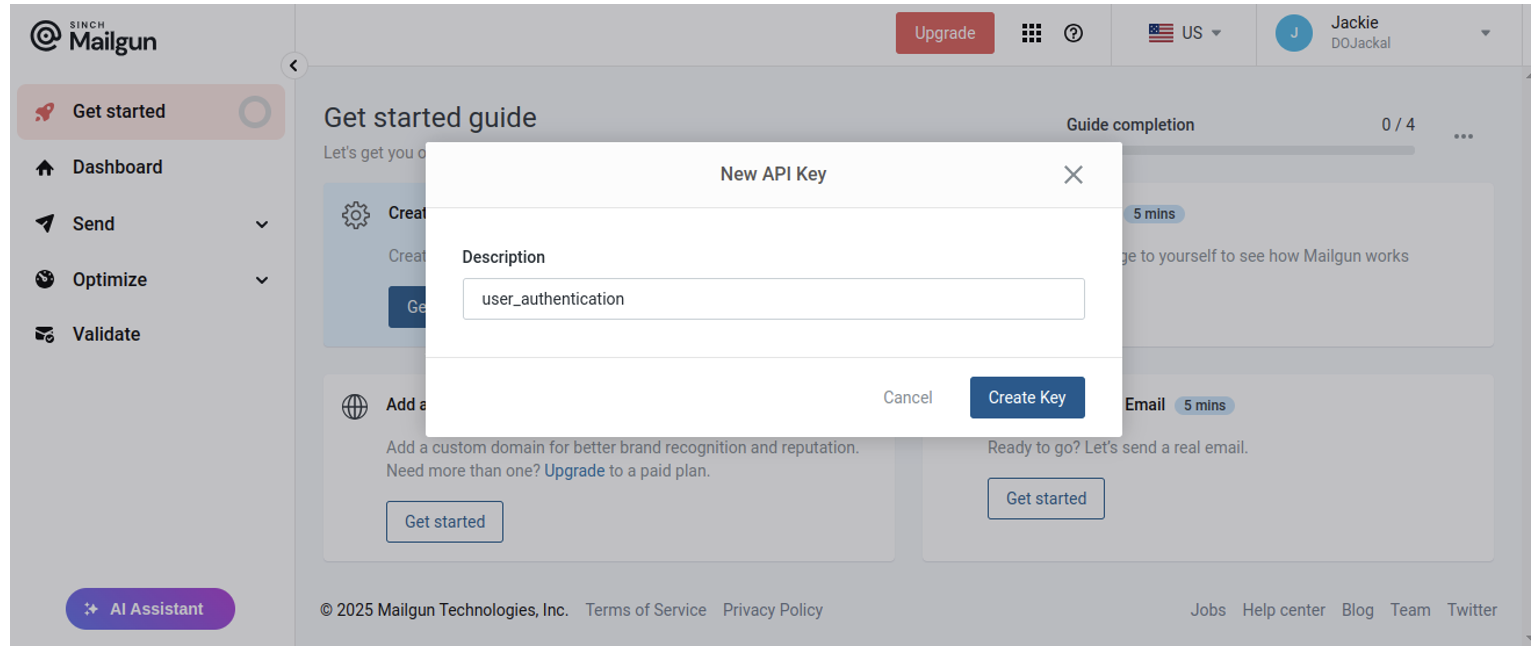
Click the Get started button under Create an API Key. Then, provide a description that properly describes the API’s key purpose. For example, if the API key is for user authentication processes, you can name it something like user_authentication and click Create Key:
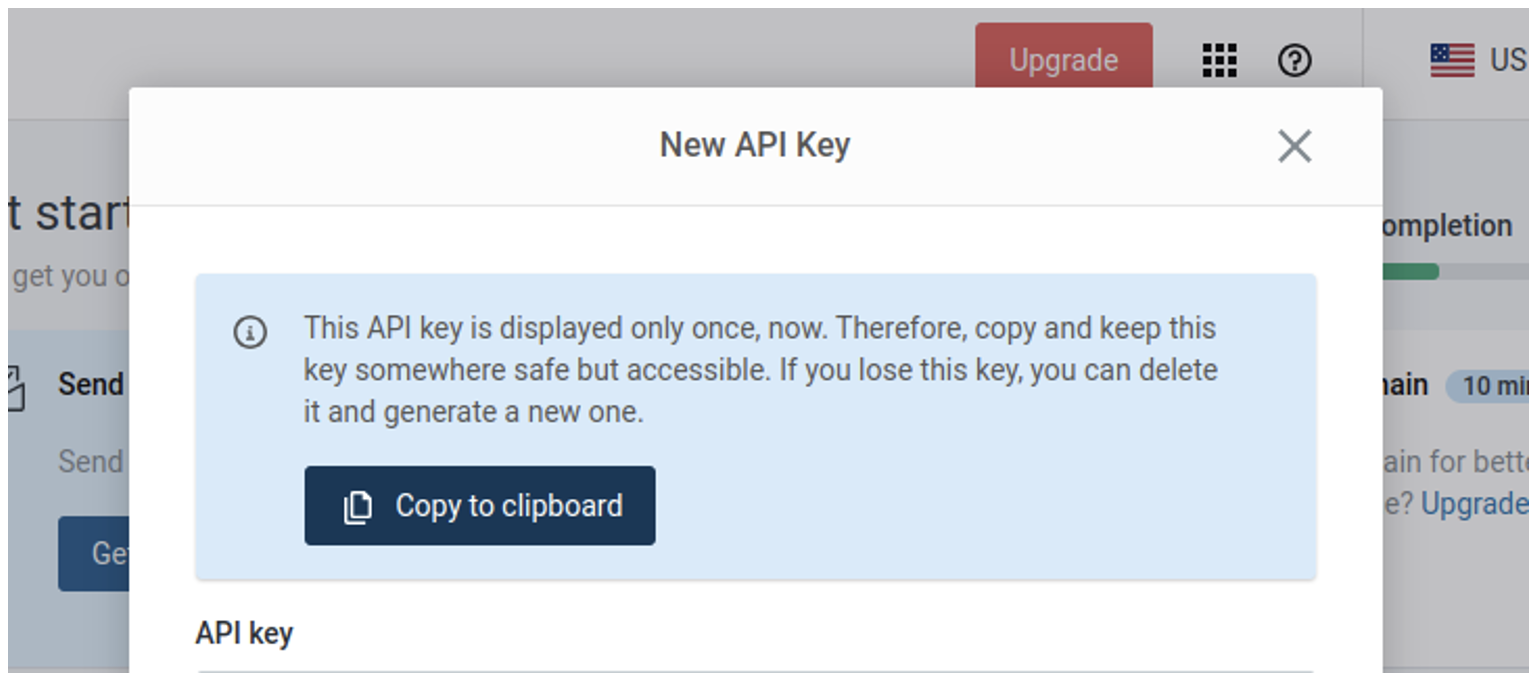
Make sure to copy and keep this key somewhere safe, as this is the only time the key will be displayed:
Building the application interface using FastAPI
To build the application interface that powers the email workflow, the first thing you need to do is install the necessary libraries. Before you do, create a project directory by running mkdir my_fastapi_app and launch a virtual environment in the directory.
Then, install the necessary libraries with the following command:
pip install fastapi jinja2 requests uvicorn python-multipart
Here, you install:
fastapi, which serves as the main backend frameworkjinja2, which serves your frontend templatesrequests, which sends HTTP requests to the Mailgun API
While FastAPI is primarily for building APIs, adding the jinja2 library allows for full-stack development – but it requires proper directory setup. Your project structure should follow this format:
my_fastapi_app/

│── main.py # Main FastAPI application file

│── users.json # JSON file storing user data

│── templates/ # HTML templates folder

│ ├── login.html # Login page

│ ├── home.html # Home page

│ ├── passwordReset.html # Password reset page

│── static/ # Static files folder

│ ├── styles.css # Styles for the login.html and passwordReset.html files
You can find all the code for this tutorial in this GitHub repository.
With your project structure in place, you can either copy and paste the code into the respective files or clone the GitHub repository above with the following command:
git clone https://github.com/EphraimX/building-transactional-email-workflows-for-password-resets-with-mailgun-api.git
Let’s take a look at the first section of the main.py file. This file is where all the magic happens, as it connects the frontend and backend operations:
import osrnimport jsonrnimport uuidrnimport requestsrnimport urllib.parsernfrom fastapi import FastAPI, Request, Formrnfrom pydantic import BaseModelrnfrom fastapi.responses import HTMLResponsernfrom fastapi.staticfiles import StaticFilesrnfrom fastapi.templating import Jinja2Templatesrnrnapp = FastAPI()rnapp.mount("/static", StaticFiles(directory="static"), name="static")rntemplates = Jinja2Templates(directory="templates")rnrnclass loginData(BaseModel):rn username: strrn password: strrnrn@app.get("/login", response_class=HTMLResponse)rnasync def login(request: Request):rn return templates.TemplateResponse("login.html", {"request": request, "message": ""})rnrn@app.get("/passwordResetView/", response_class=HTMLResponse)rnasync def password_reset_view(request: Request):rn return templates.TemplateResponse(rn "passwordReset.html", {"request": request, "message": ""}rn )rnrn@app.post("/home", response_class=HTMLResponse)rnasync def password_reset(rn request: Request, email_address: str = Form(...), password: str = Form(...)rn):rnrn # Open and read the JSON DB filern try:rn with open("users.json", "r") as file:rn users = json.load(file)rn except (FileNotFoundError, json.JSONDecodeError):rn users = []rnrn for user in users:rnrn if user["email_address"] == email_address and user["password"] == password:rn return templates.TemplateResponse("home.html", {"request": request})rnrn # If no match was found, return an error messagern return templates.TemplateResponse(rn "login.html",rn {rn "request": request,rn "message": "Email or Password Incorrect. If you cannot remember your password, kindly reset it.",rn },rn )rn
In this code, the app handles authentication by serving login and password reset pages while verifying credentials in users.json. The app initializes FastAPI, configures templates, and defines a loginData model for validation. The /login and /passwordResetView/ routes serve their respective pages, while /home verifies credentials, redirecting valid users or displaying errors. The password reset function generates a unique link using uuid and sends it via Mailgun’s API.
To test this out, open your makeshift database (users.json) and paste the following:
[rn {rn "username" : "sinchy",rn "email_address" : "sinch@gmail.com",rn "password" : "sinch12345"rn },rn {rn "username" : "grinchy",rn "email_address" : "rinch@gmail.com",rn "password" : "grinch67890"rn }rn]
You should also authorize these email addresses via the Mailgun dashboard if you’re using a sandbox domain.
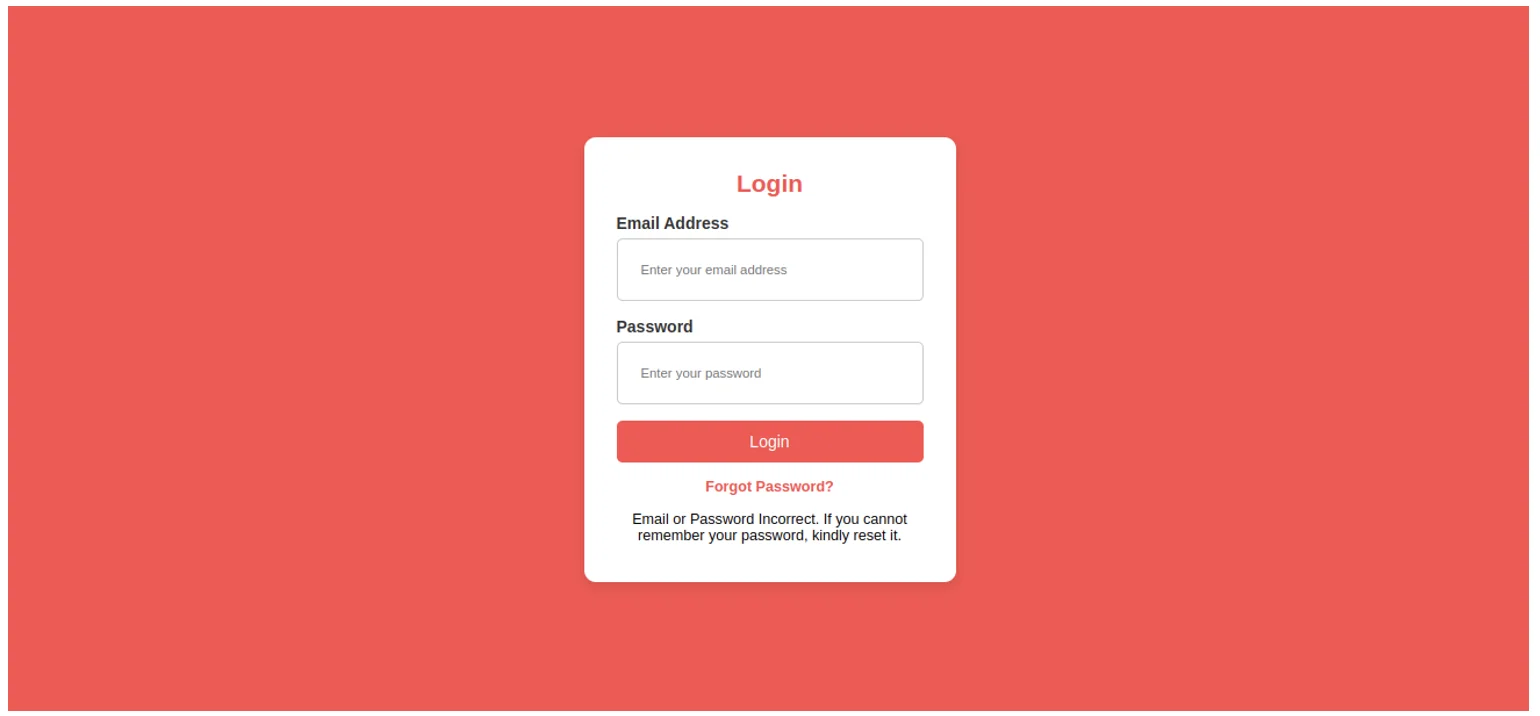
Start your application by running the command uvicorn main:app –reload. Then, head over to http://localhost:8000/login, where you should see this:

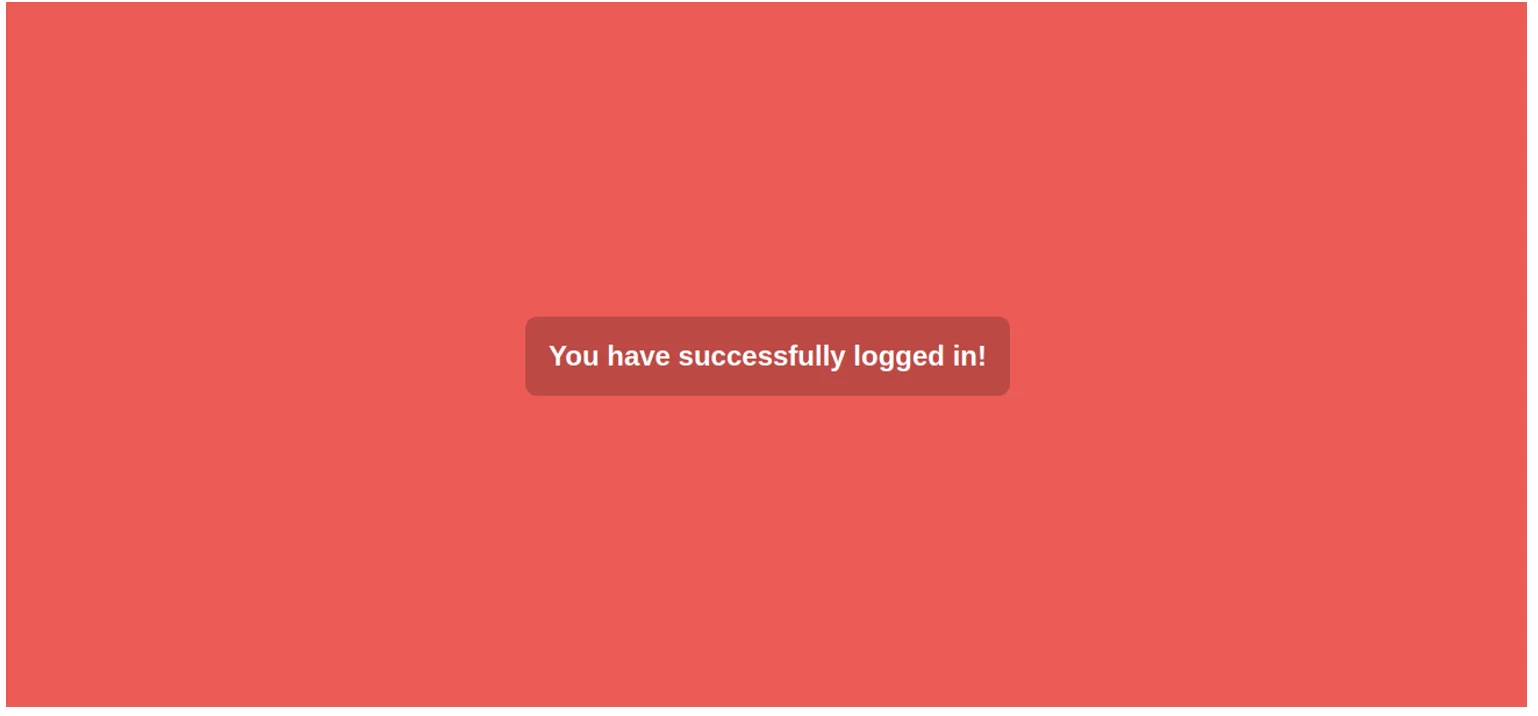
If you attempt to log in with any of the credentials in the users.json file, you’ll be taken to the home page:
If you input the wrong login information, you’ll see the following:
Setting up a connection to Mailgun
To send emails using Mailgun, you need to establish a connection between your application and Mailgun’s email service.
To do so, open main.py and paste the following code, replacing
def send_simple_message(API_KEY):rn response = requests.post(rn "https://api.mailgun.net/v3/<SANDBOX_URL>/messages",rn auth=("api", f"{API_KEY}"),rn data={"from": "Mailgun Sandbox <postmaster@<SANDBOX_URL>>",rn "to": "<RECIPIENT_NAME> <RECIPIENT_EMAIL>",rn "subject": "Hello <RECIPIENT_NAME>",rn "text": "Congratulations <RECIPIENT_NAME>, you just sent an email with Mailgun! You are truly awesome!"rn }rn )rnrn print(response.json())rn return responsern
For testing purposes, pass your API key directly when calling the function:
send_simple_message("your-api-key-here")
Run the script by executing the following:
python main.py
If successful, the function will print a response similar to this:
{
"id": "
"message": "Queued. Thank you."
}
This confirms that the email request has been successfully queued by Mailgun.
Designing and setting up the email template
To work on the password reset logic, you need to design the template for the email that’s sent to the user. With Mailgun, there are two ways to design an email: HTML or Mailgun’s drag-and-drop template builder. You’ll use the HTML approach here.
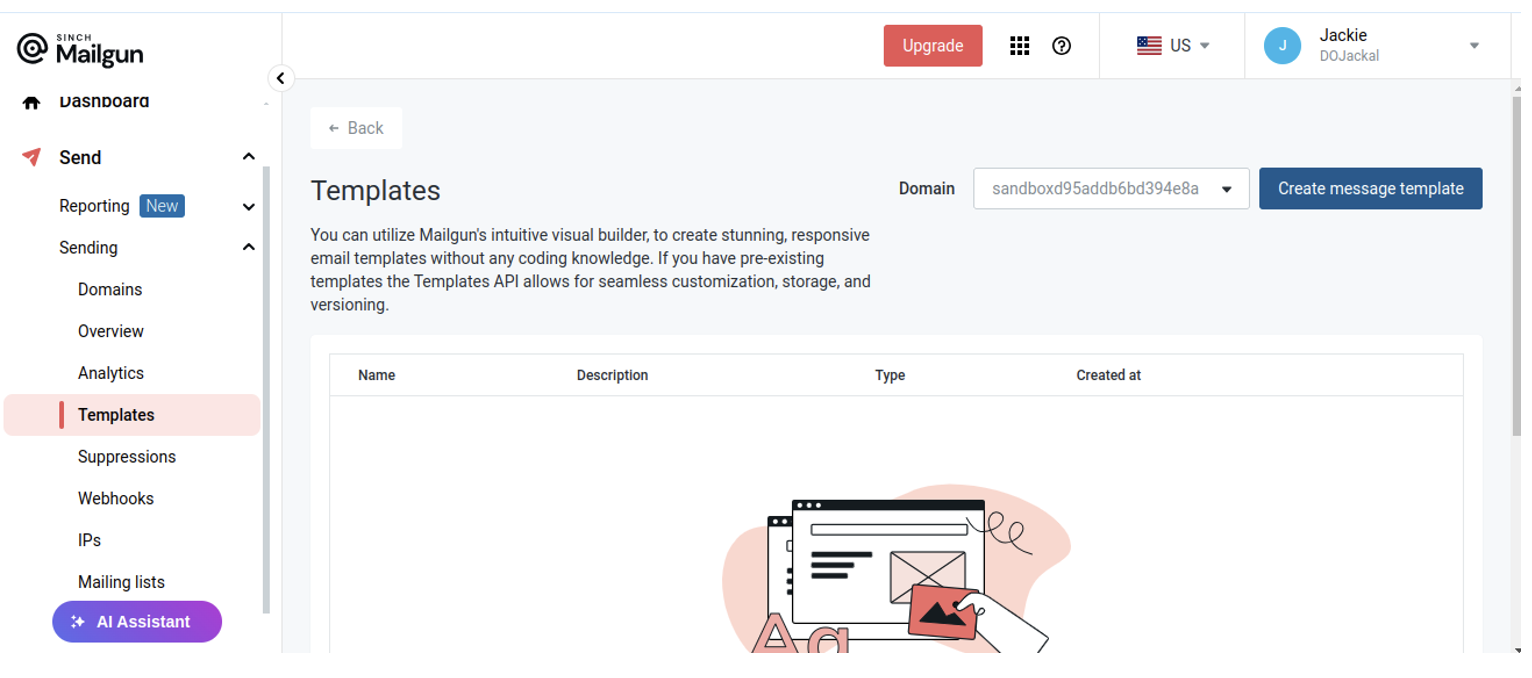
To begin the design, go to your Mailgun dashboard and navigate to Send > Sending > Templates:
Next, click Create message template, select the option to code it in HTML, and click the Blank template:

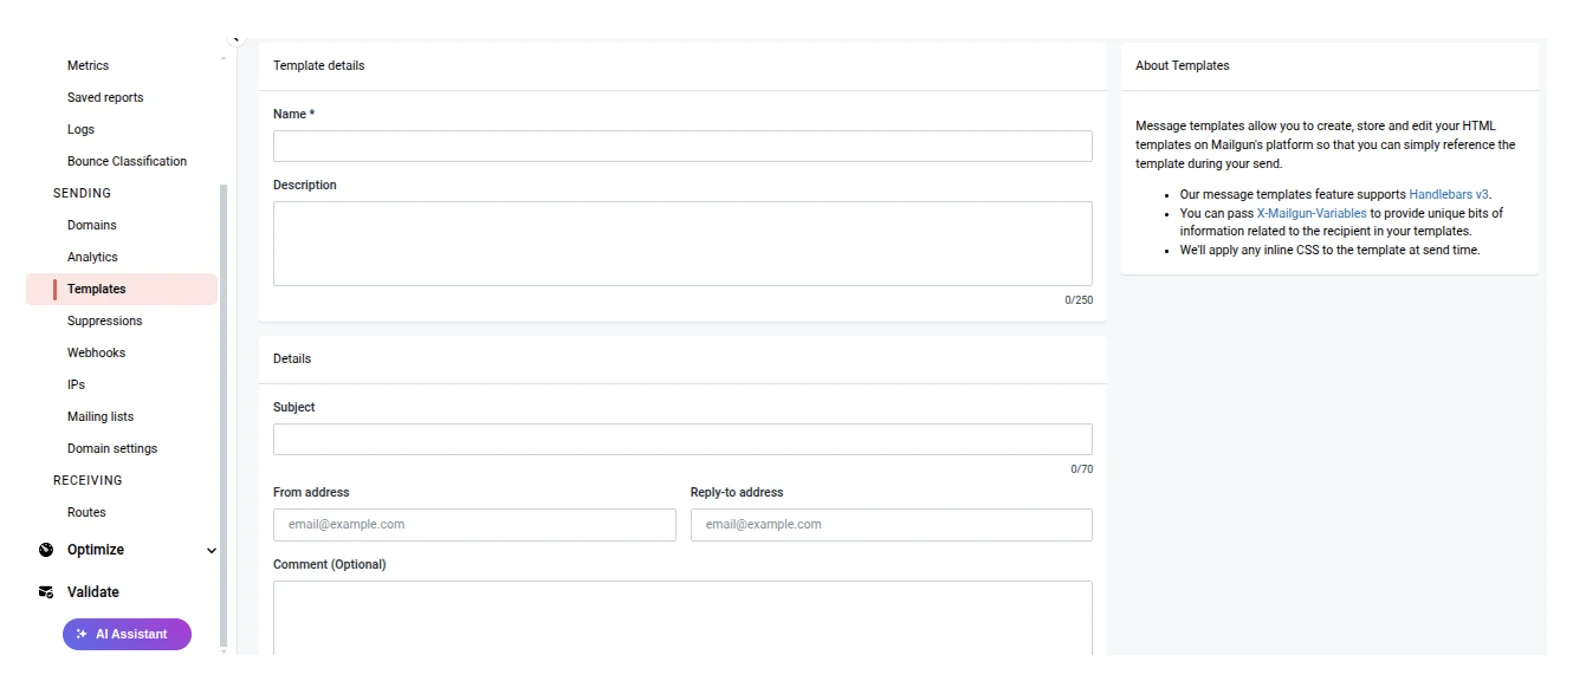
Fill in the template form with the name, description, and details of the email:
Then, scroll down to the Editor tab and copy and paste the code from the email_template.html file:

When you select the Test Data tab, you’ll see two dynamic variables: username and reset_link.
Select the Preview tab to see the template:
Finally, click the Create button to create it.
Implementing the email sending functionality
Once your email template is ready, it’s time to build out the email sending functionality. Open the main.py file and paste the following code:
@app.post("/resetPassword/")rnasync def reset_password(request: Request, email_address: str = Form(...)):rnrn # Open and read the JSON DB filern try:rn with open("users.json", "r") as file:rn users = json.load(file)rn except (FileNotFoundError, json.JSONDecodeError):rn users = []rnrn for user in users:rn if user["email_address"] == email_address:rnrn email_address = user["email_address"]rn username = user["username"]rn reset_link = await generate_password_reset_link(email_address)rnrn response = await send_password_reset_email(rn username, email_address, reset_linkrn )rnrn if response["success"]:rnrn return templates.TemplateResponse(rn "login.html",rn {rn "request": request,rn "message": "Kindly check your email to reset your password.",rn },rn )rnrn else:rnrn return templates.TemplateResponse(rn "passwordReset.html",rn {rn "request": request,rn "message": "Unfortunately, we ran into an error while trying to reset your password. Kindly try again, and if the issue persists, please contact support.",rn },rn )rnrn # If no match was found, return an error messagern return templates.TemplateResponse(rn "passwordReset.html",rn {rn "request": request,rn "message": "Unfortunately, we do not have a record of your email. Kindly reach out to the site administrator.",rn },rn )rnrnasync def send_password_reset_email(username, email_address, reset_link):rnrn API_KEY = os.getenv("API_KEY") # Fetch API key from environmentrnrn if not API_KEY:rn print("Error: API_KEY is not set!")rn return {"success": False, "error": "API key is missing"}rnrn try:rn response = requests.post(rn "https://api.mailgun.net/v3/<SANDBOX_URL>/messages",rn auth=("api", API_KEY),rn data={rn "from": "Mailgun Sandbox <postmaster@<SANDBOX_URL>>",rn "to": f"{username} <{email_address}>",rn "subject": f"Hello {username}",rn "template": "<EMAIL_TEMPLATE_NAME>",rn "h:X-Mailgun-Variables": json.dumps(rn {"reset_link": reset_link, "username": username}rn ),rn },rn )rnrn if response.status_code == 200:rn print(f"Password reset email sent successfully to {email_address}")rn return {"success": True, "message": "Email sent successfully"}rn else:rn print(rn f"Failed to send email. Status Code: {response.status_code}, Response: {response.text}"rn )rn return {"success": False, "error": response.text}rnrn except requests.exceptions.RequestException as e:rn print(f"Request failed: {str(e)}")rn return {"success": False, "error": str(e)}rnrnasync def generate_password_reset_link(rn email_address, base_url="https://mailgunny.com/reset-password"rn):rn token = uuid.uuid4()rn encoded_email = urllib.parse.quote(email_address)rn return f"{base_url}?email={encoded_email}&token={token}"rn
In this code, the reset_password function (@app.post("/resetPassword/")) processes password reset requests by checking if the submitted email exists in the users.json database. If found, it generates a unique reset link using generate_password_reset_link(email_address) and sends the reset email via send_password_reset_email(username, email_address, reset_link). The function then returns a success message if the email was sent or displays an error message if not. If no matching email is found, an appropriate error response is provided.
Note: Replace the API_KEY variable with the key to your Mailgun account.
To test the implementation, run uvicorn main:app –reload and open http://localhost:8000/login. Click the Forgot Password? link:

Enter an email present in your users.json file and click Reset Password:

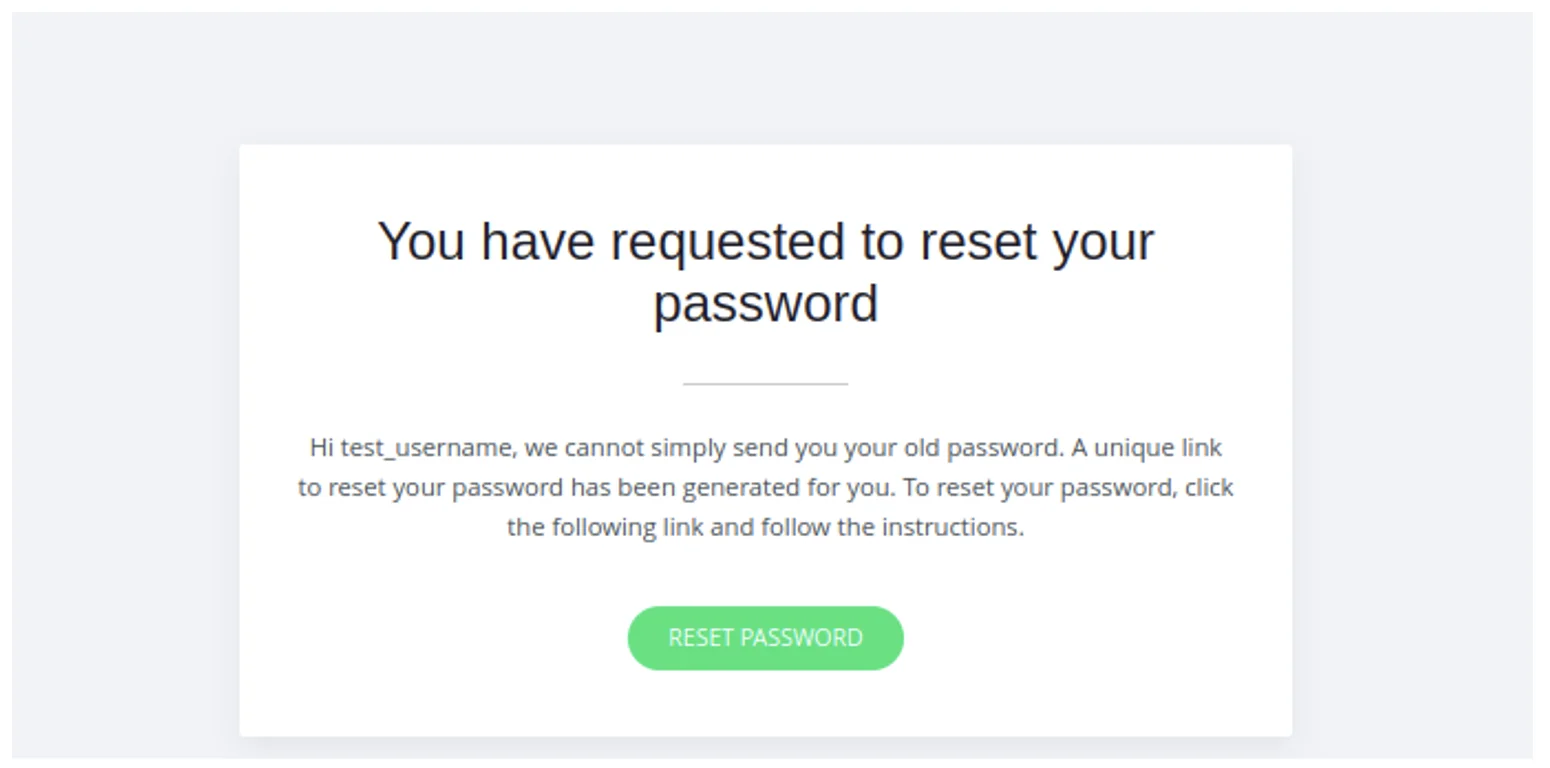
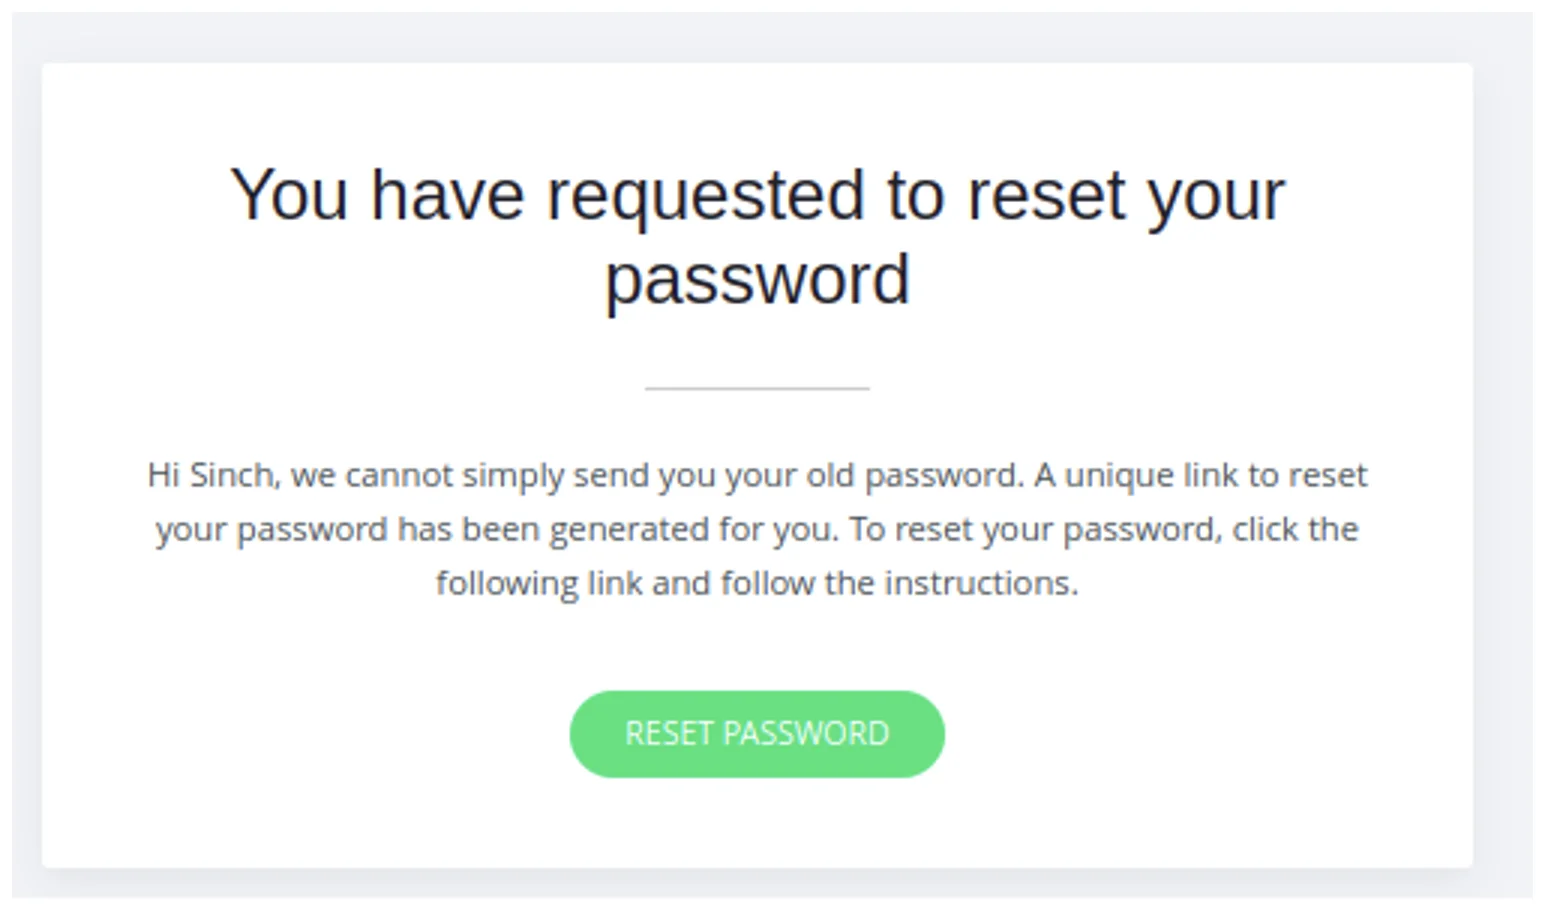
If successful, you should be directed back to the login page, where you’ll be met with instructions to check your email. You should see the following email in the recipient’s email inbox:
Integrating with application events
Integrating with application events using webhooks allows your system to automatically respond to real-time updates from external services.
A webhook is essentially an HTTP callback. Whenever a specific event occurs in an external application (such as a payment confirmation, user signup, or password reset request), the service sends a request to your predefined webhook URL. This enables seamless automation, reducing the need for manual intervention or periodic polling. By configuring your application to listen for these webhook events, you can trigger relevant actions, such as updating a database, sending notifications, or processing transactions, as soon as the event happens.
To integrate webhooks with Mailgun, you need to create an endpoint. To do that, open the main.py file and paste the following code at the end:
@app.post("/webhooks/password-reset")rnasync def handle_webhook(request: Request):rn data = await request.json()rn print(f"Password reset email clicked: {data}")rn return {"status": "received", "status_code": 200}rn
Return to the dashboard and go to Send > Sending > Webhooks:
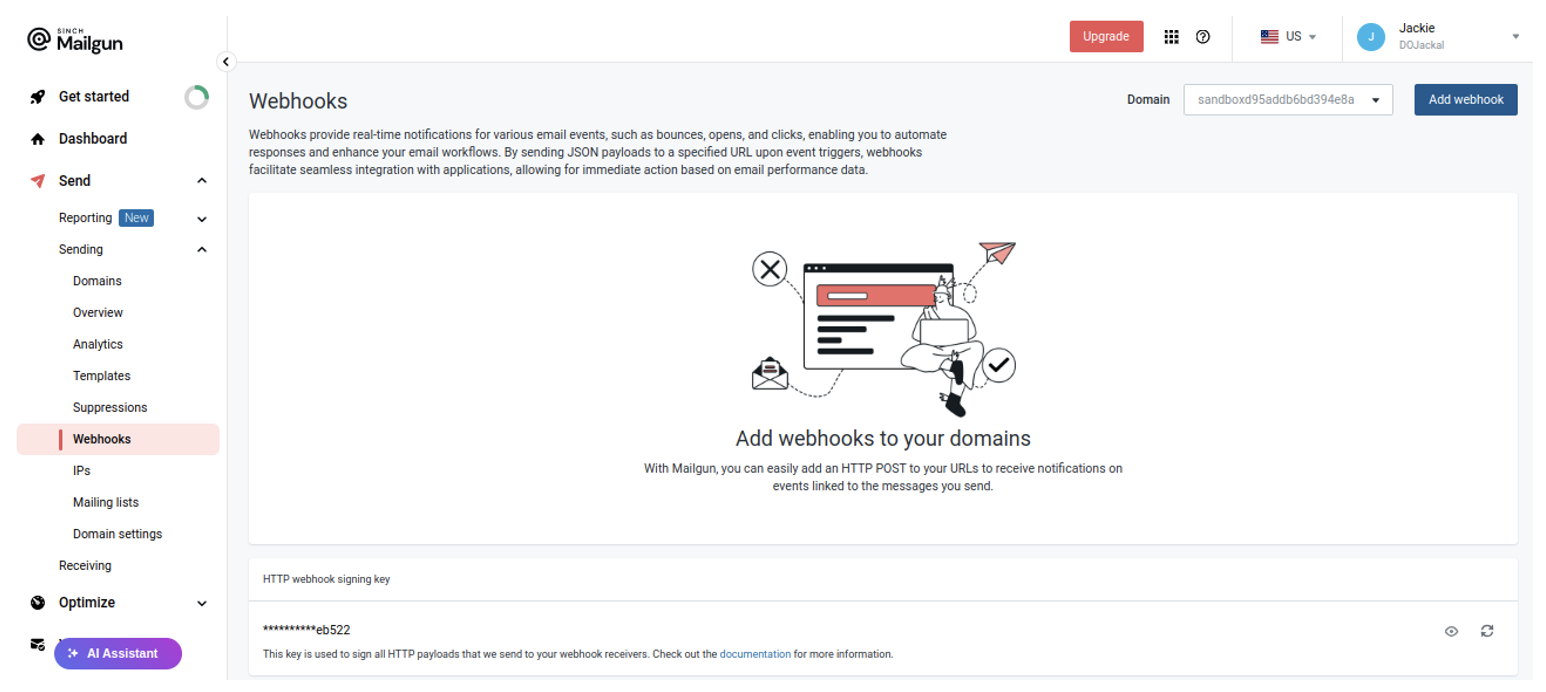
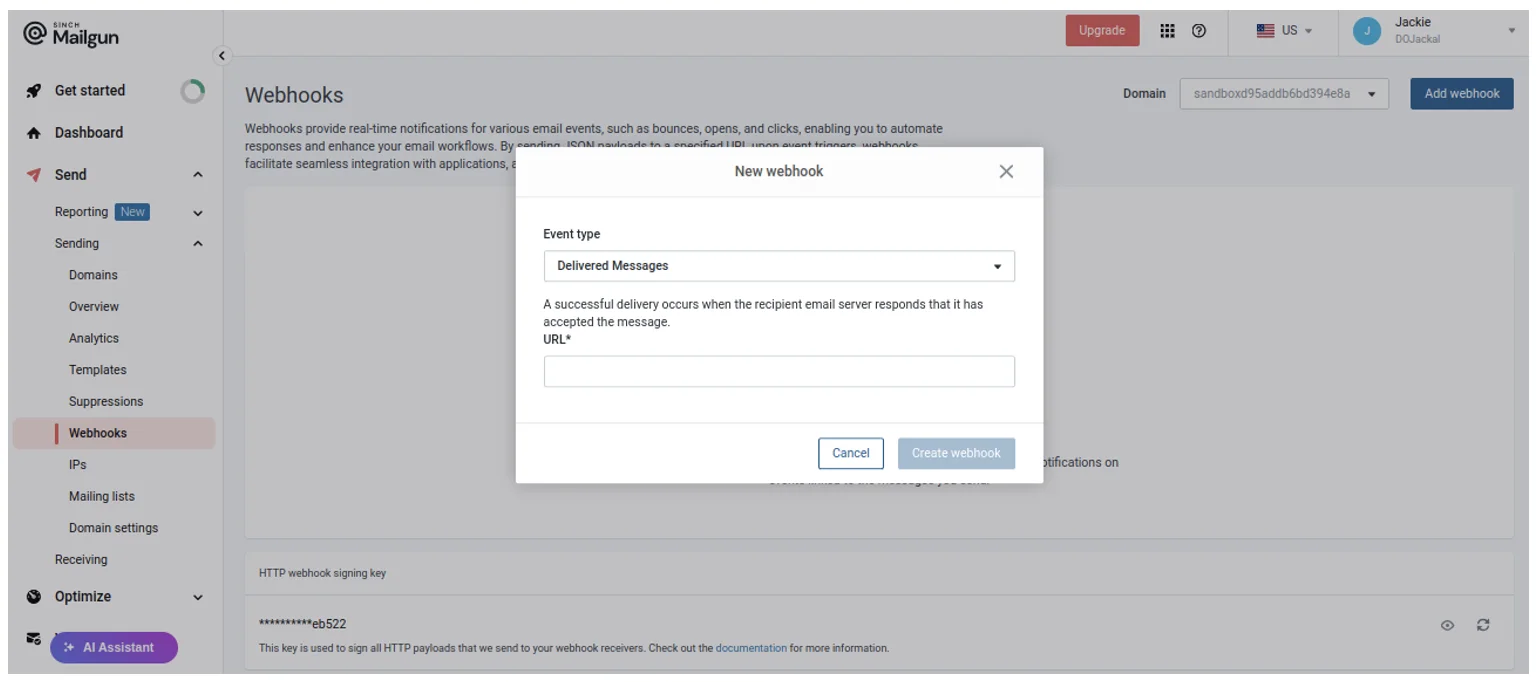
Click Add webhook in the top-right corner. In the drop-down list of event types, select Delivered Messages, and in the URL field, input the route to your webhook URL. In this case, it’s https://
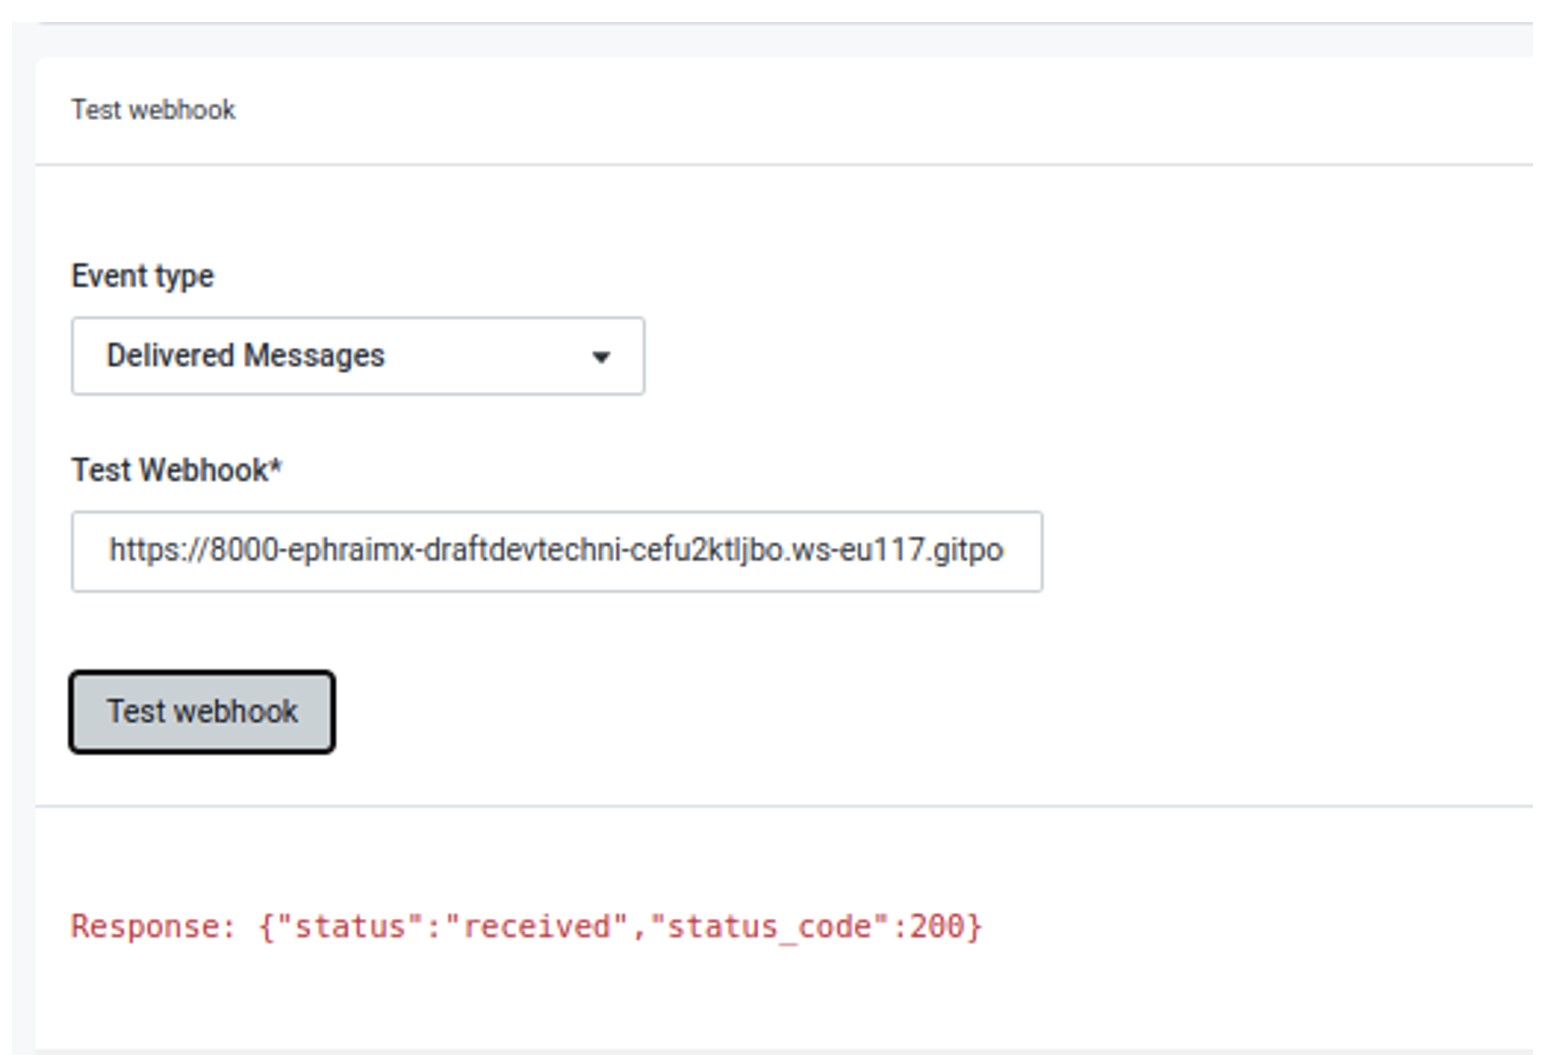
Test the webhook. Your result should look like this:
On the server side, you should get the following message:
Password reset email clicked: {'signature': {'token': '41929b08bb287b8a0b157f7834844b6bc483b7b090692a2b15', 'timestamp': '1739785355', 'signature': '117f70dcf985c72df30c07b02898dd458d1cbbad29d0457ccee8c4497f89c5ac'}, 'event-data': {'id': 'CPgfbmQMTCKtHW6uIWtuVe', 'timestamp': 1521472262.908181, 'log-level': 'info', 'event': 'delivered', 'delivery-status': {'tls': True, 'mx-host': 'smtp-in.example.com', 'code': 250, 'description': '', 'session-seconds': 0.4331989288330078, 'utf8': True, 'attempt-no': 1, 'message': 'OK', 'certificate-verified': True}, 'flags': {'is-routed': False, 'is-authenticated': True, 'is-system-test': False, 'is-test-mode': False}, 'envelope': {'transport': 'smtp', 'sender': 'bob@sandbox9199067bcb654265aae9ce9e308b6150.mailgun.org', 'sending-ip': '209.61.154.250', 'targets': 'alice@example.com'}, 'message': {'headers': {'to': 'Alice <alice@example.com>', 'message-id': '20130503182626.18666.16540@sandbox9199067bcb654265aae9ce9e308b6150.mailgun.org', 'from': 'Bob <bob@sandbox9199067bcb654265aae9ce9e308b6150.mailgun.org>', 'subject': 'Test delivered webhook'}, 'attachments': [], 'size': 111}, 'recipient': 'alice@example.com', 'recipient-domain': 'example.com', 'storage': {'url': 'https://se.api.mailgun.net/v3/domains/sandbox9199067bcb654265aae9ce9e308b6150.mailgun.org/messages/message_key', 'key': 'message_key'}, 'campaigns': [], 'tags': ['my_tag_1', 'my_tag_2'], 'user-variables': {'my_var_1': 'Mailgun Variable #1', 'my-var-2': 'awesome'}}}
This may change depending on the email being sent.
Monitoring and managing emails
Peter Drucker, a famous management consultant, once said:
If you can’t measure it, you can’t improve it.
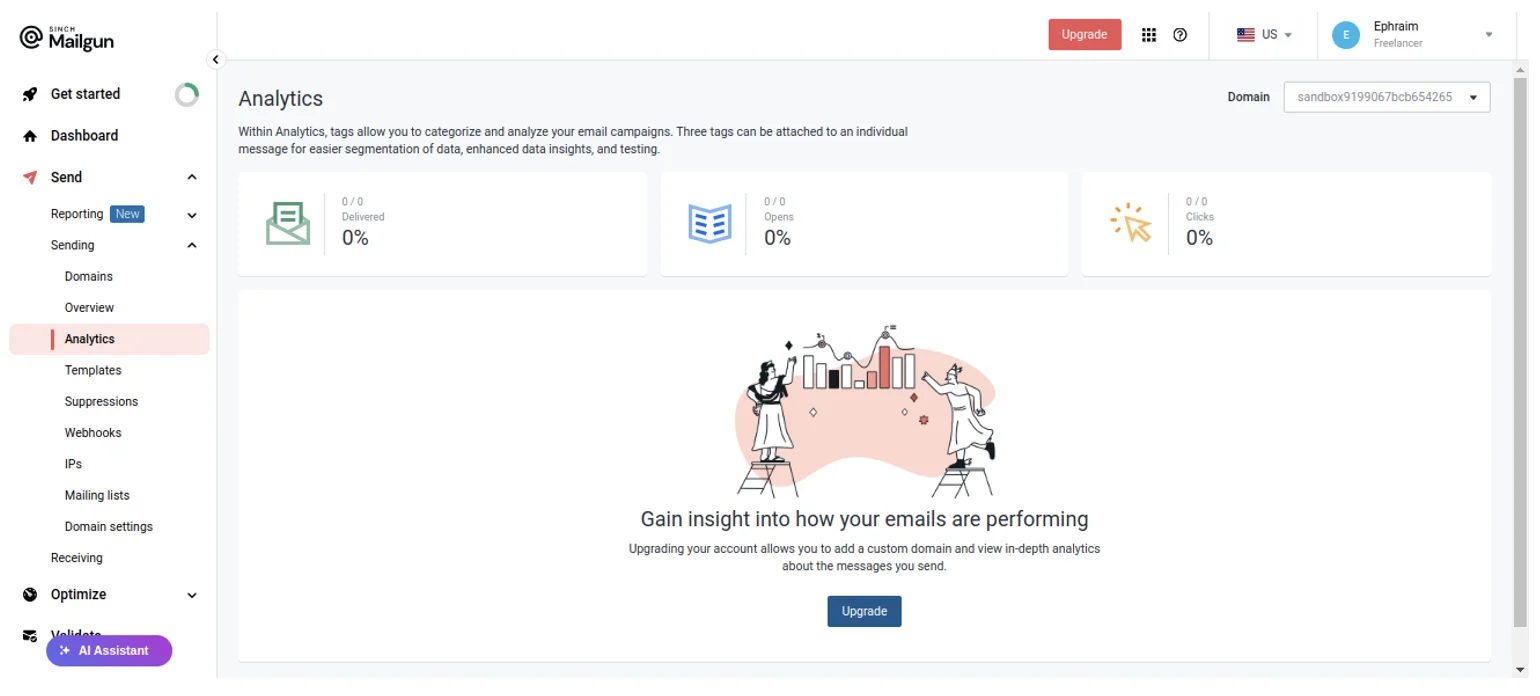
In line with this, Mailgun provides tools to check the performance of sent emails. For example, the Send > Sending > Analytics page helps measure what percentage of emails are being delivered, opened, and clicked:
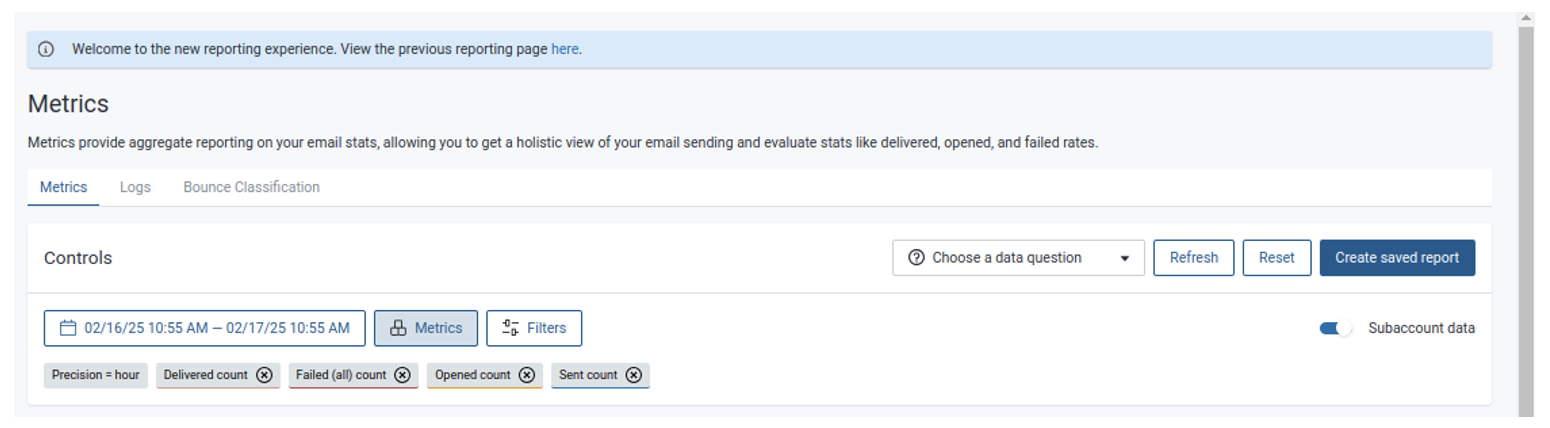
On the Send > Reporting > Metrics page, you can get detailed information about how your emails are performing:
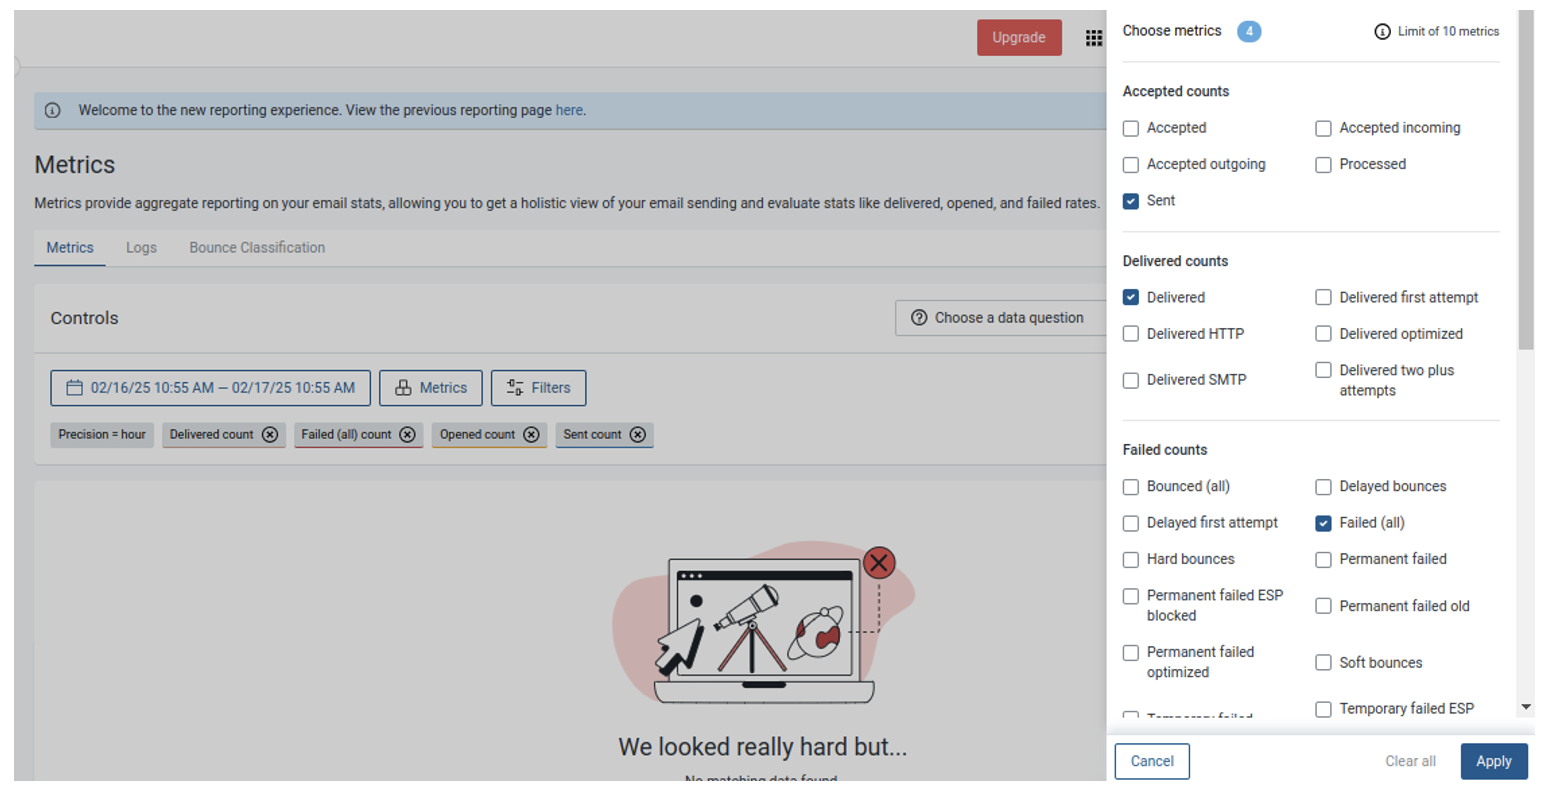
You can also choose the metrics you wish to see over a given period:
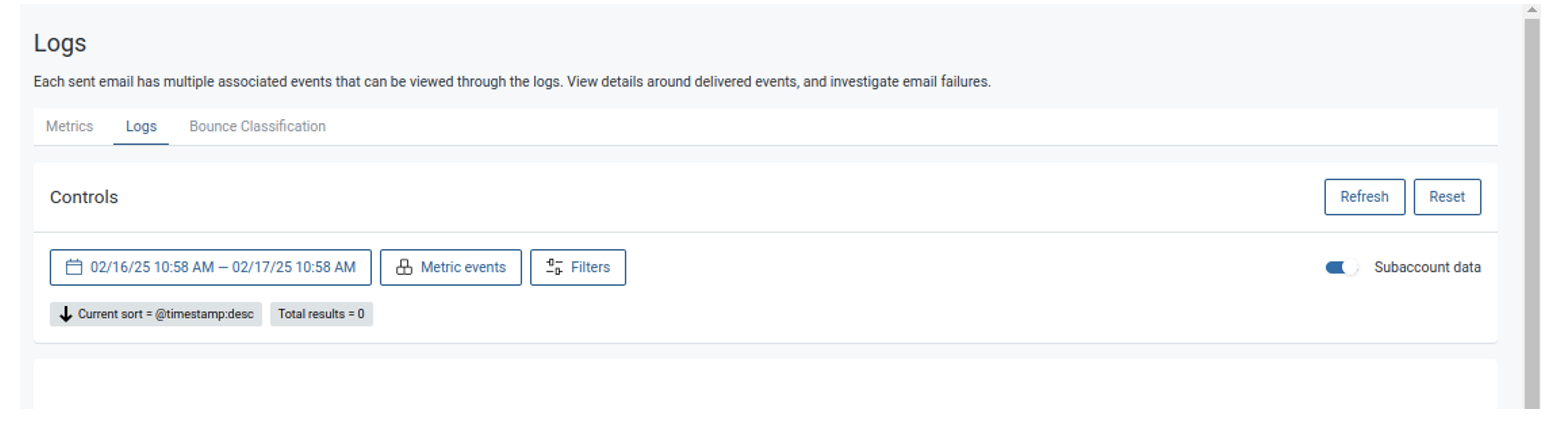
Mailgun also provides you with logs in case you want to dig deeper into delivered events and investigate failures when they occur:
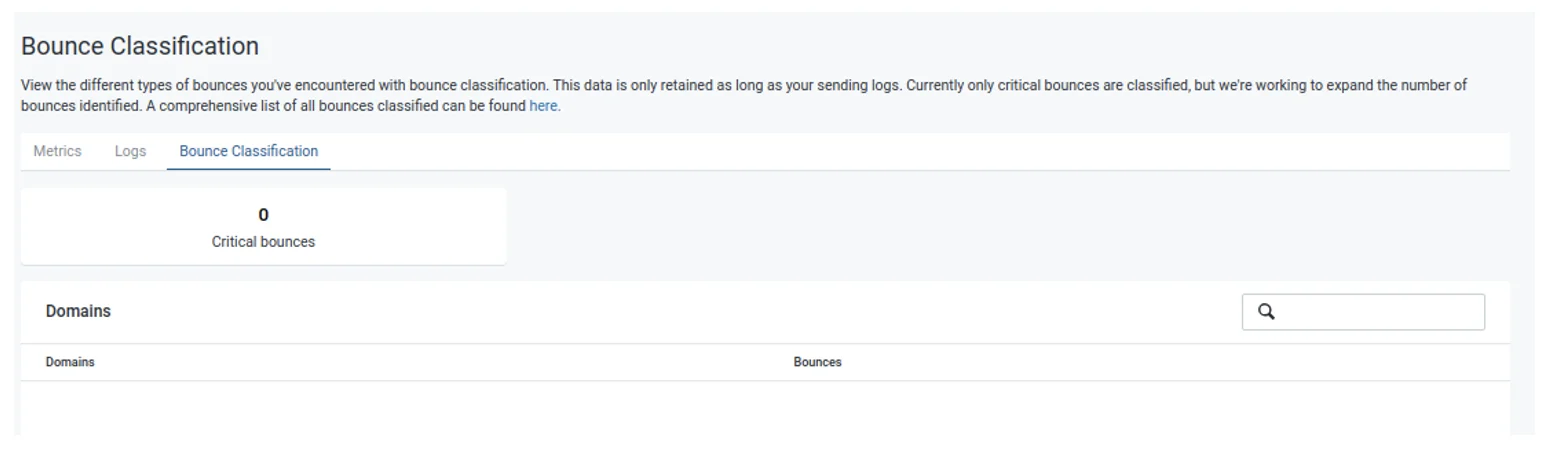
Lastly, Mailgun provides a bounce classification to see how many of your emails don’t go through. It also lets you know how many of those bounces are critical:
Wrapping up
In this tutorial, you learned how to build a complete transactional email workflow for password resets using Mailgun’s API. After setting up a Mailgun account and obtaining an API key, you built an application interface using FastAPI. You then designed and configured an email template, implemented email sending functionality, and integrated webhooks for real-time event tracking.
Transactional email operations are critical in providing a seamless and secure user experience, especially for password resets. Mailgun can help you automate this process, improving security and productivity while eliminating manual intervention. Implementing this approach in your projects will not only increase customer satisfaction but also help maintain a dependable authentication system.